
How to Swap a Product in a Photo With AI (8 Steps)
Swap a product in a photo with AI on Seadanse: box the item, write the replacement (several in one line), and keep the rest of the photo untouched, up to 4K.
 The Seadanse Team14 min read
The team behind Seadanse. We run the models we write about, and we publish the specs, prices and limits the marketing leaves out.

TL;DR — To swap a product in a photo with AI, open "Edit an image" in Seadanse's AI Image Creator, draw a box around the product, write up to 6 replacements in one line and press "Generate". We swapped a raspberry danish for a chocolate éclair in a 5504×3072 bakery photo and got a 5504×3072 photo back, with the price tags and the other five pastries untouched. Everything outside the box comes back as it was, and "Compare with the original" and "Show what changed" let you check it before you download.
One product shoot takes a day of styling and light. Then you want the same table with next week's special or a different flavour in it. Asking a general AI chat to "replace the danish" redraws your whole picture, so the labels, prices and light shift.
The fix is a box. When you swap a product in a photo with AI on Seadanse, you mark only the product you want to replace. Only that spot changes, and everything outside your box stays exactly as it was.
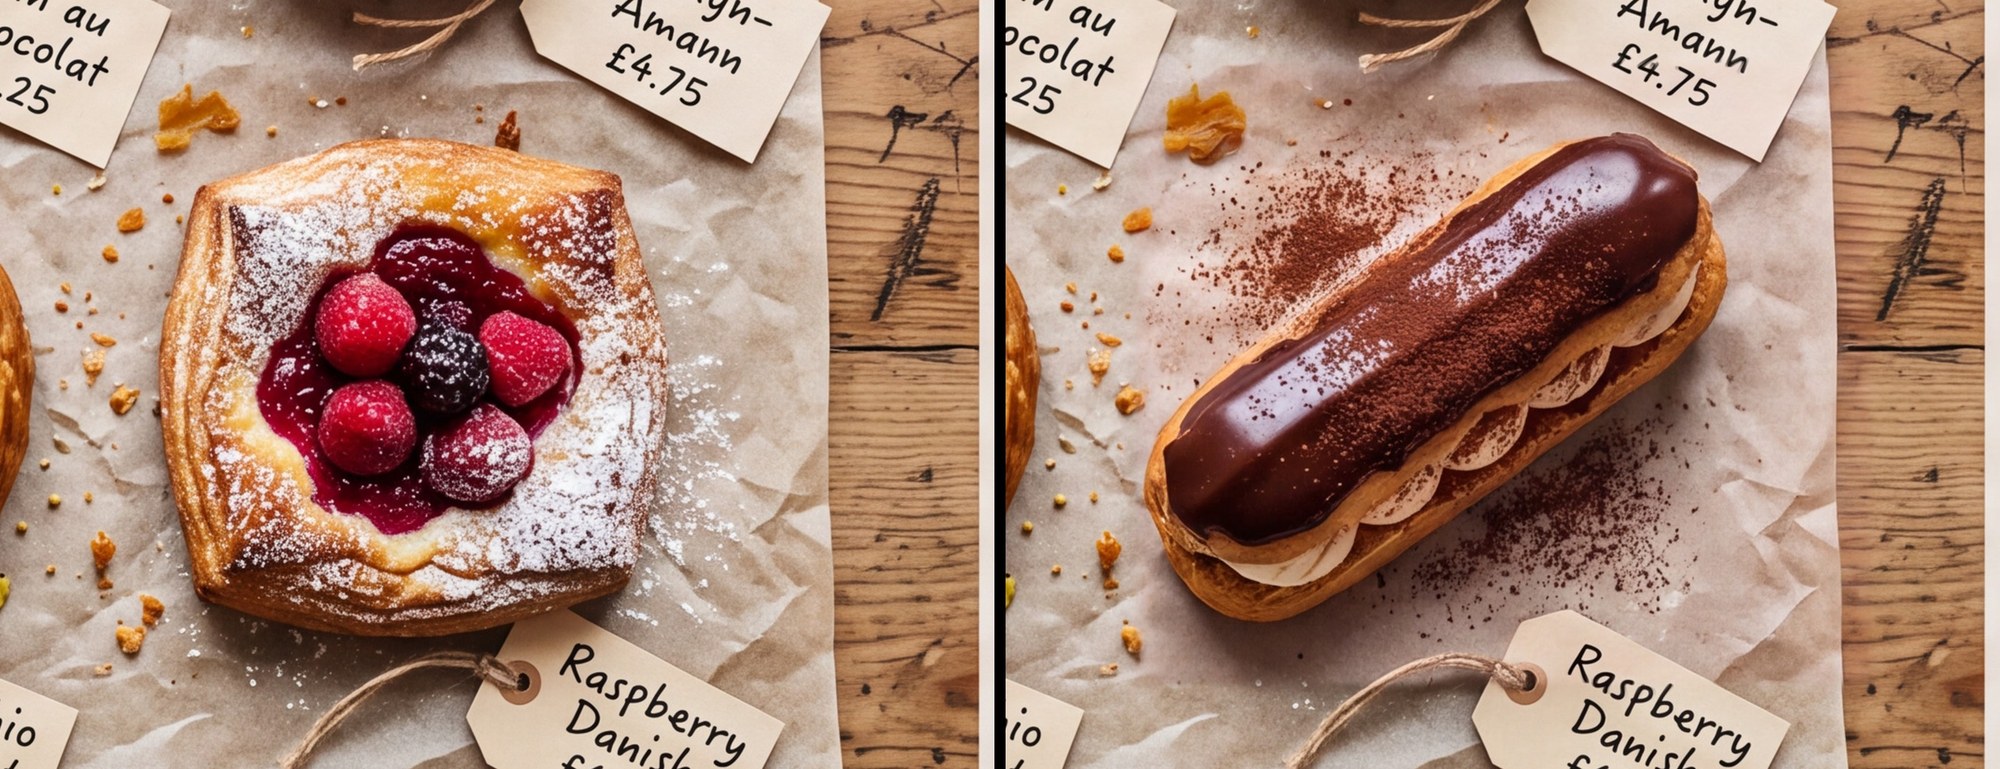
We tested our bakery poster at 4K (the editor's largest size; our wide bakery photo came back 5504×3072, big enough for print and big screens). The raspberry danish became a chocolate éclair dusted with cocoa, while the baking paper, the wood and the hand-written price tags stayed untouched.
What You Need to Swap a Product in a Photo With AI
One product photo and a Seadanse account are all you'll need to swap a product in a photo with AI. You don't install an app, because the editor runs in your web browser.
- One photo: Upload a JPG, PNG or WebP from your computer or phone, or pick an image you've made on Seadanse.
- An account: Sign in on Seadanse so the composer's "Generate" button is ready.
- A few words: Type the name of the replacement product you'd like in that spot.
- Credits or Unlimited images: Each image takes 7 credits at 1K, 11 at 2K or 16 at 4K. Credits are the site's own currency from a plan or a pack, and 1K edits take 0 credits with "Unlimited images" on Pro.
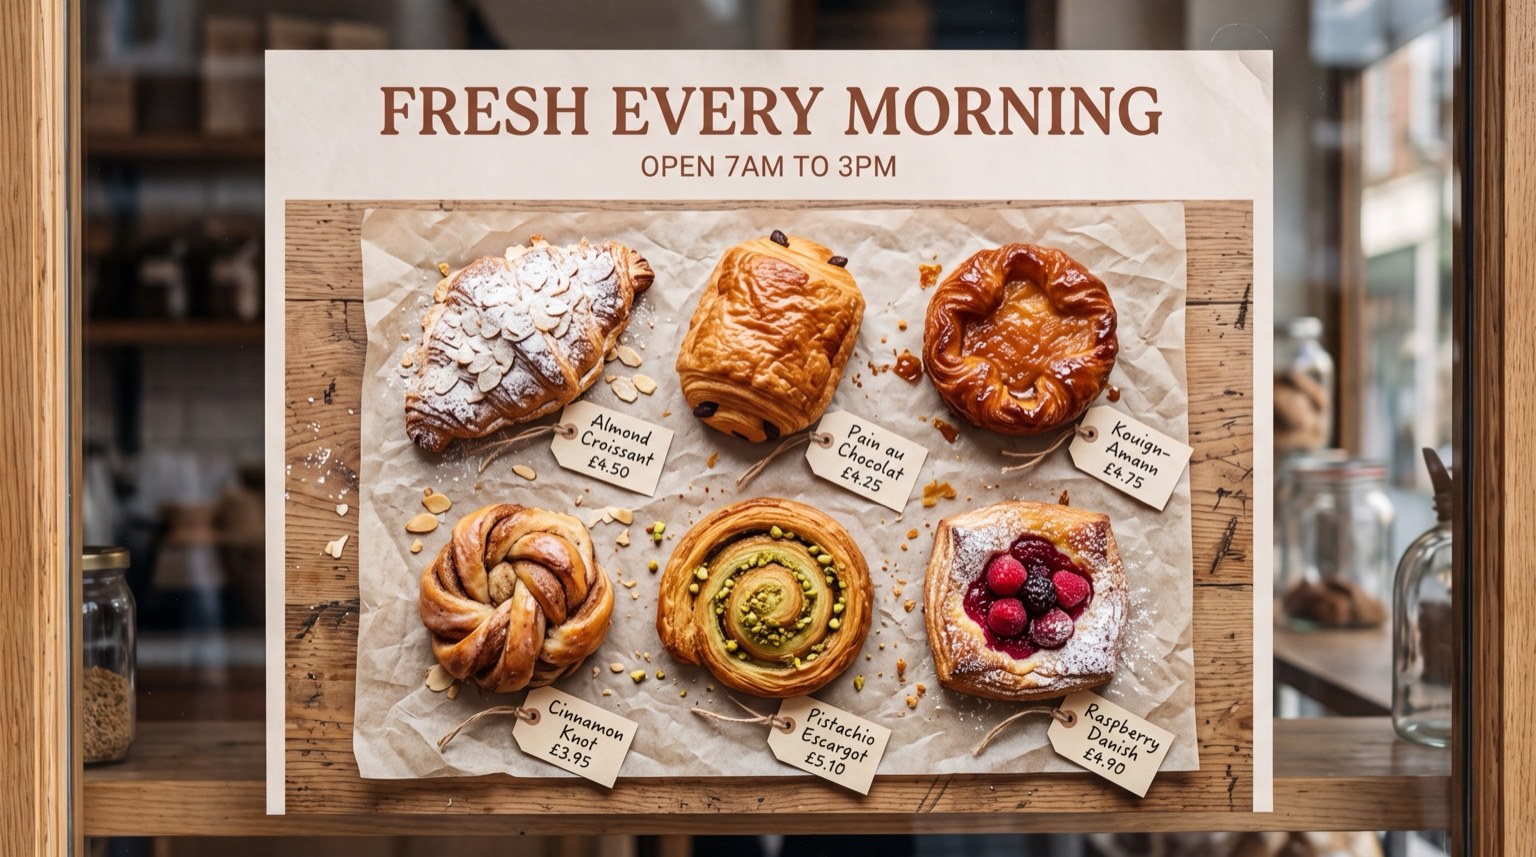
Here's the photo we use in every step below: a bakery window poster with six pastries and their hand-written price tags.
Step 1: Open "Edit an Image" in the AI Image Creator
Opening the image editor in the AI Image Creator starts on the "Image" tab of the composer. Press the mode button that reads "Text/Image to Image" to open the "Generation mode" menu.
Pick "Edit an image", which carries the line "Mark the spots to change. The rest stays exactly as it is." That'll open the "Choose an image to edit" window.
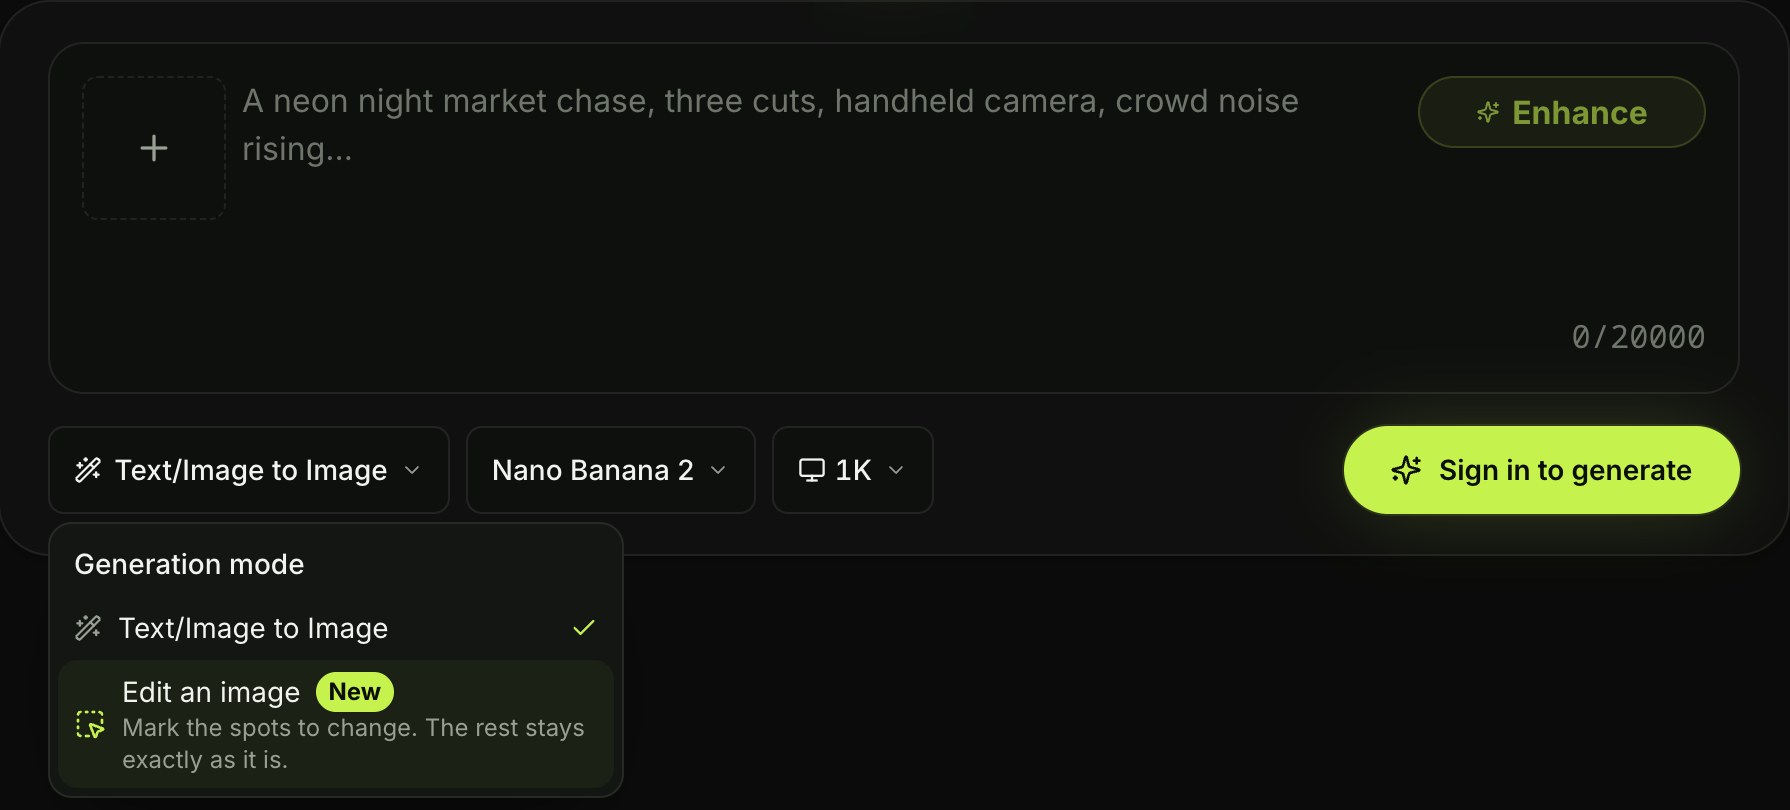
There are two other ways in. Press "Edit this image" under any finished image result. Or, after you upload a photo and write a change prompt, click "Edit this image →" on the "Only changing part of this image?" hint.
Step 2: Choose the Photo for Your Product Swap
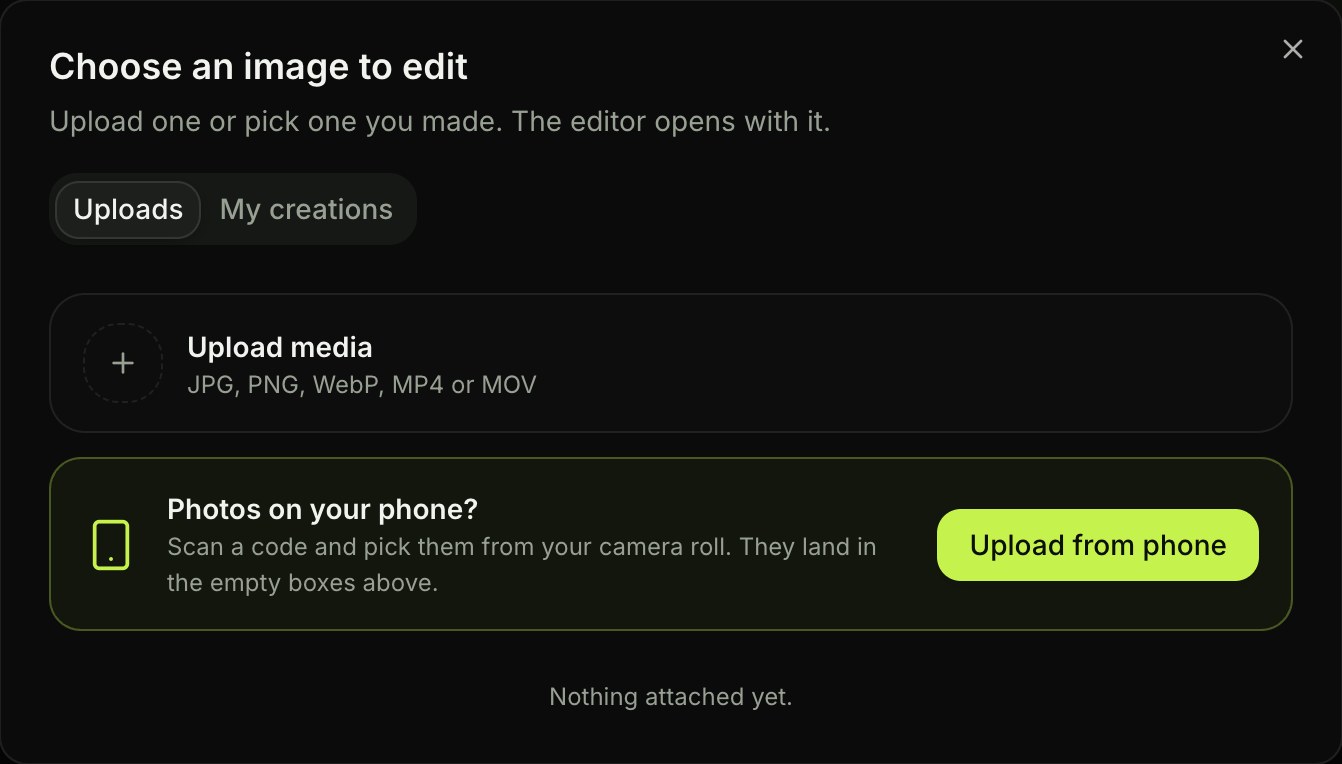
The "Choose an image to edit" window asks you to upload a photo or pick one you've made on Seadanse. As the prompt says, "Upload one or pick one you made. The editor opens with it."
- "Uploads" tab: Drop a JPG, PNG or WebP into "Upload media", or pick a file you've uploaded earlier.
- "My creations" tab: Pick any image you've generated on Seadanse.
- "Upload from phone": Press this button under "Photos on your phone?" to scan a code and pick a photo from your camera roll.
Step 3: Draw a Box Around the Product to Swap
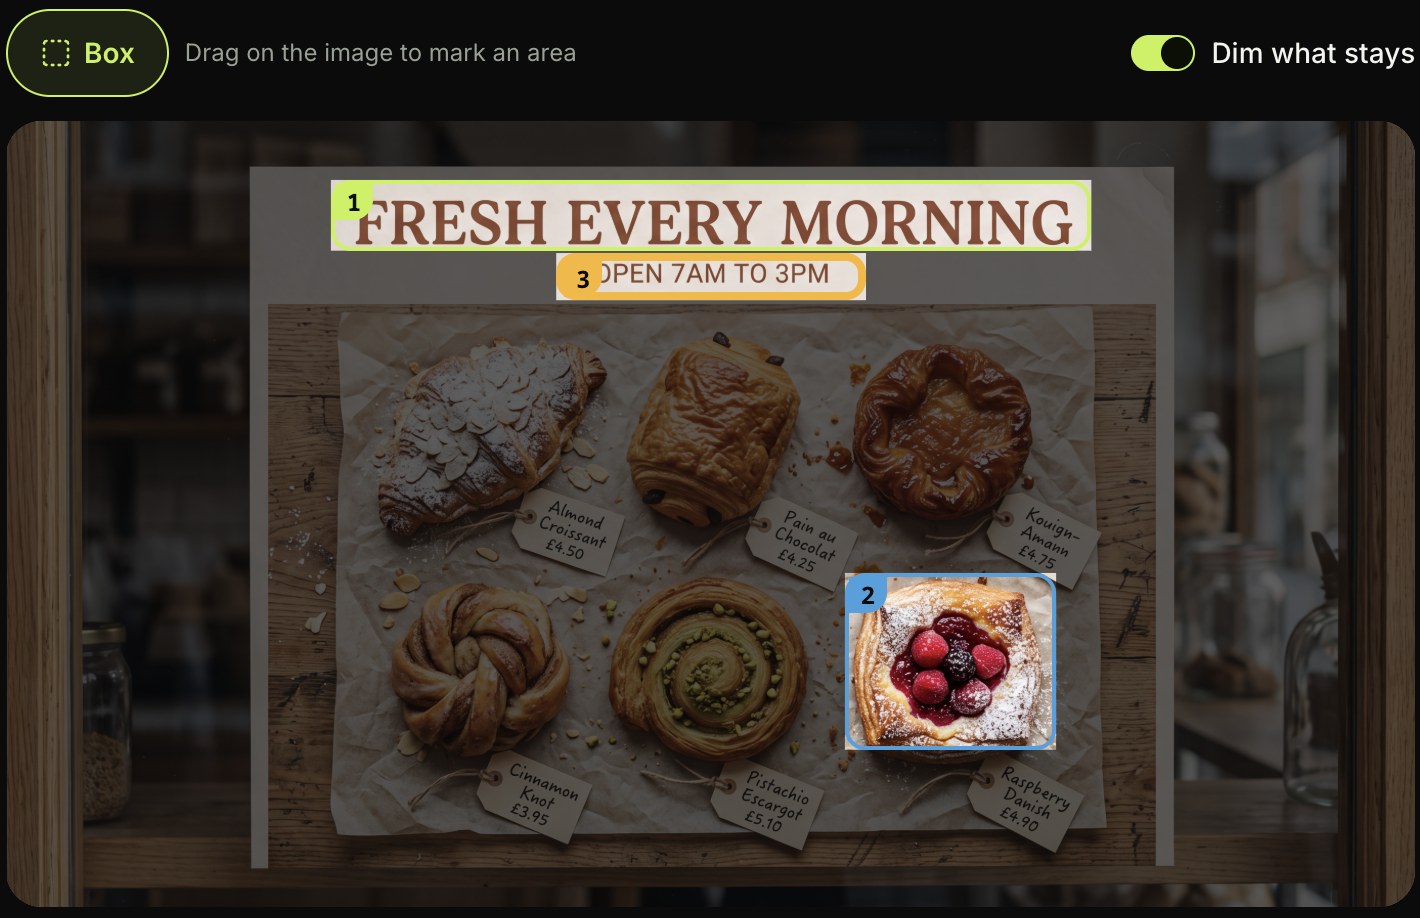
The "Box" tool lets you drag on the image to mark the area where your replacement product goes. The panel explains the rule word for word: "Only what you mark can change — Mark an area and say what to change in it. Everything outside the area comes back exactly as it is."
Each box you draw gets a number on the photo and its own row in the panel, such as "Area 1" and "Area 2". We drew box 2 around the raspberry danish, while box 1 holds the headline and box 3 holds the opening hours in the same press.
Turn on "Dim what stays" to darken everything outside your boxes. That way, you'll see what you've marked.
If you'd like a deeper look at the box tool, read our guide on how to edit only part of an image with AI.
Step 4: Replace a Product With Several Options in One Line
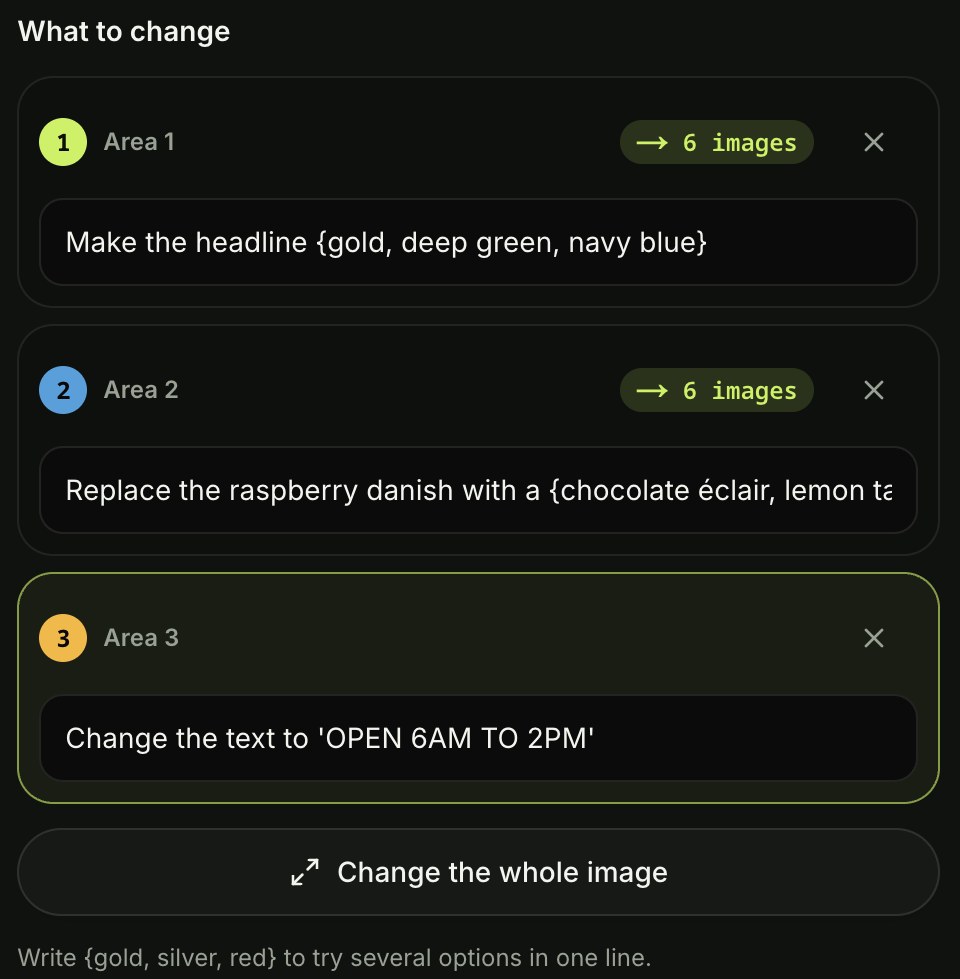
Each area's "What to change" line is where you tell the editor how to replace a product in a photo with AI. You can write one replacement, or put up to 6 options inside curly braces with commas. Each option becomes its own image.
The editor's hint shows the pattern: "Write '{gold, silver, red}' to try several options in one line." On Area 2, we typed "Replace the raspberry danish with a {chocolate éclair, lemon tart, pistachio macaron stack}".
A chip on the row updates to read "→ 6 images" when you pair three options with two versions.
Step 5: Pick Versions and Resolution for Each Product Swap
"Versions" and "Resolution" sit at the bottom of the panel. They control how many tries you'll get and how big the finished photos come back. A version is another try at the same change, so you can pick the best one.
- "Versions": Pick ×1, ×2 or ×4 to get that many tries at every option you've written.
- "Resolution": Pick 1K, 2K or 4K; 4K keeps a big photo big when it comes back.
Three options times two versions is 6 images, so you'll get two tries at each pastry.

Step 6: Press Generate and Check the Count First
The summary line above the button shows the exact image count and credits you'll use before you press anything. The button itself carries the total count too.
On our bakery press at 1K with "Unlimited images" on, the summary line read "14 images · 0 credits" and the button read "Generate 14 images". Without "Unlimited images", a two-image press at 2K reads "2 images · 22 credits". That's because each image is 7 credits at 1K, 11 at 2K and 16 at 4K.
When you press the button, a confirm dialog lists each change, the images and the credits.

As the panel notes, "Each change is tried on its own copy of the image". Your areas and options aren't stacked into a single picture.
Step 7: Compare the Product Swap With the Original
The results list counts up as your images finish, reading "Results — 3 of 14 ready" until the whole run is done. Clicking any finished result opens "Compare with the original" so you can inspect the product swap.
- The divider: Drag the line back and forth between "Original" and "Edited" to see the replacement product sit in the spot.
- "Show what changed": Turn this switch on to highlight the pixels that changed between the two photos.
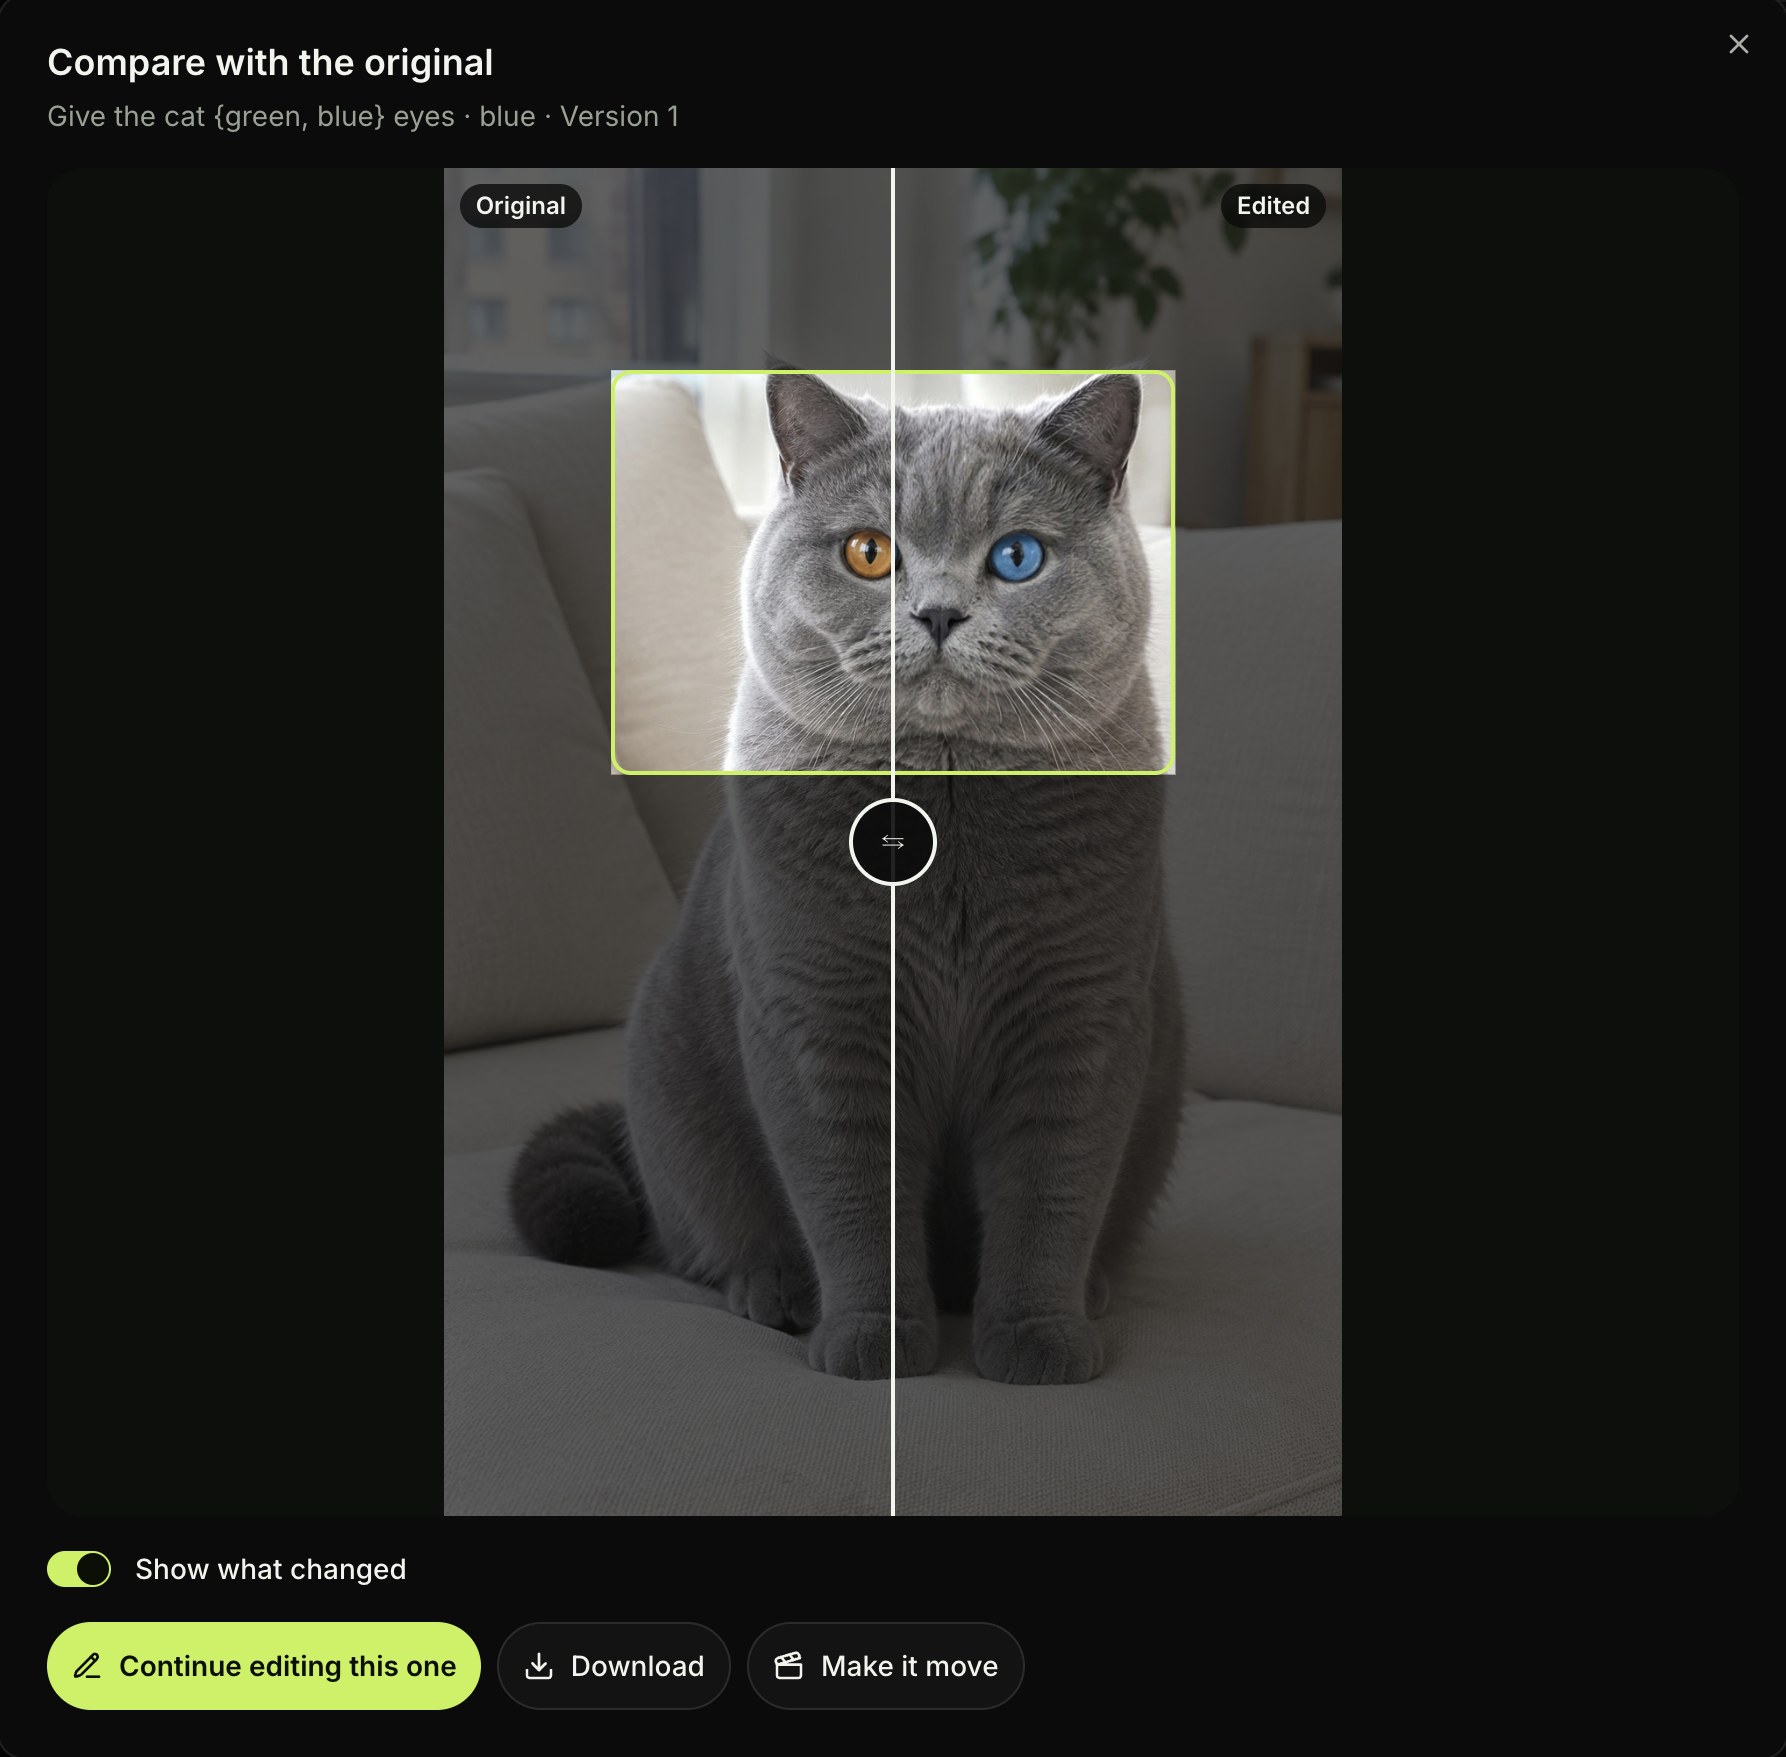
On our cat photo, "Show what changed" lit up only the boxed area around the eyes.
Step 8: Download, Keep Editing or Make It Move
Three buttons sit under every finished result. You can save the file, build another edit on top of it or turn the photo into a video.
- "Download": Saves the finished image to your device.
- "Continue editing this one": Starts your next edit from that exact result, and builds an "Edit history" trail reading "Original › Edit 1 › Edit 2". You can step back at any point; we chained five steps on one cat photo that way.
- "Make it move": Opens Seadanse's video composer with the image attached as a reference. Your product photo becomes the start of a short video.

Swap Product in Photo AI at 4K: What Came Back
Our 4K test shows what happens when you swap product in photo AI on a large shop poster. We uploaded the 5504×3072 bakery photo, drew a box around the raspberry danish, wrote "chocolate éclair" and picked 4K.
The model chip at the top of the editor panel reads "Nano Banana 2 · 7 credits/image" at 1K (or "Nano Banana 2 · no credits on Unlimited"). That's because Nano Banana 2 is the model the editor runs. The finished photo came back at 5504×3072, the exact size it went in.
In the danish's spot sits a chocolate éclair dusted with cocoa, on the same crinkled baking paper. The wood grain, the other five pastries and the hand-written price tags are untouched.
That includes "Kouign-Amann £4.75" and the tag under the éclair. It still reads "Raspberry Danish £4.90", because it sat outside the box.
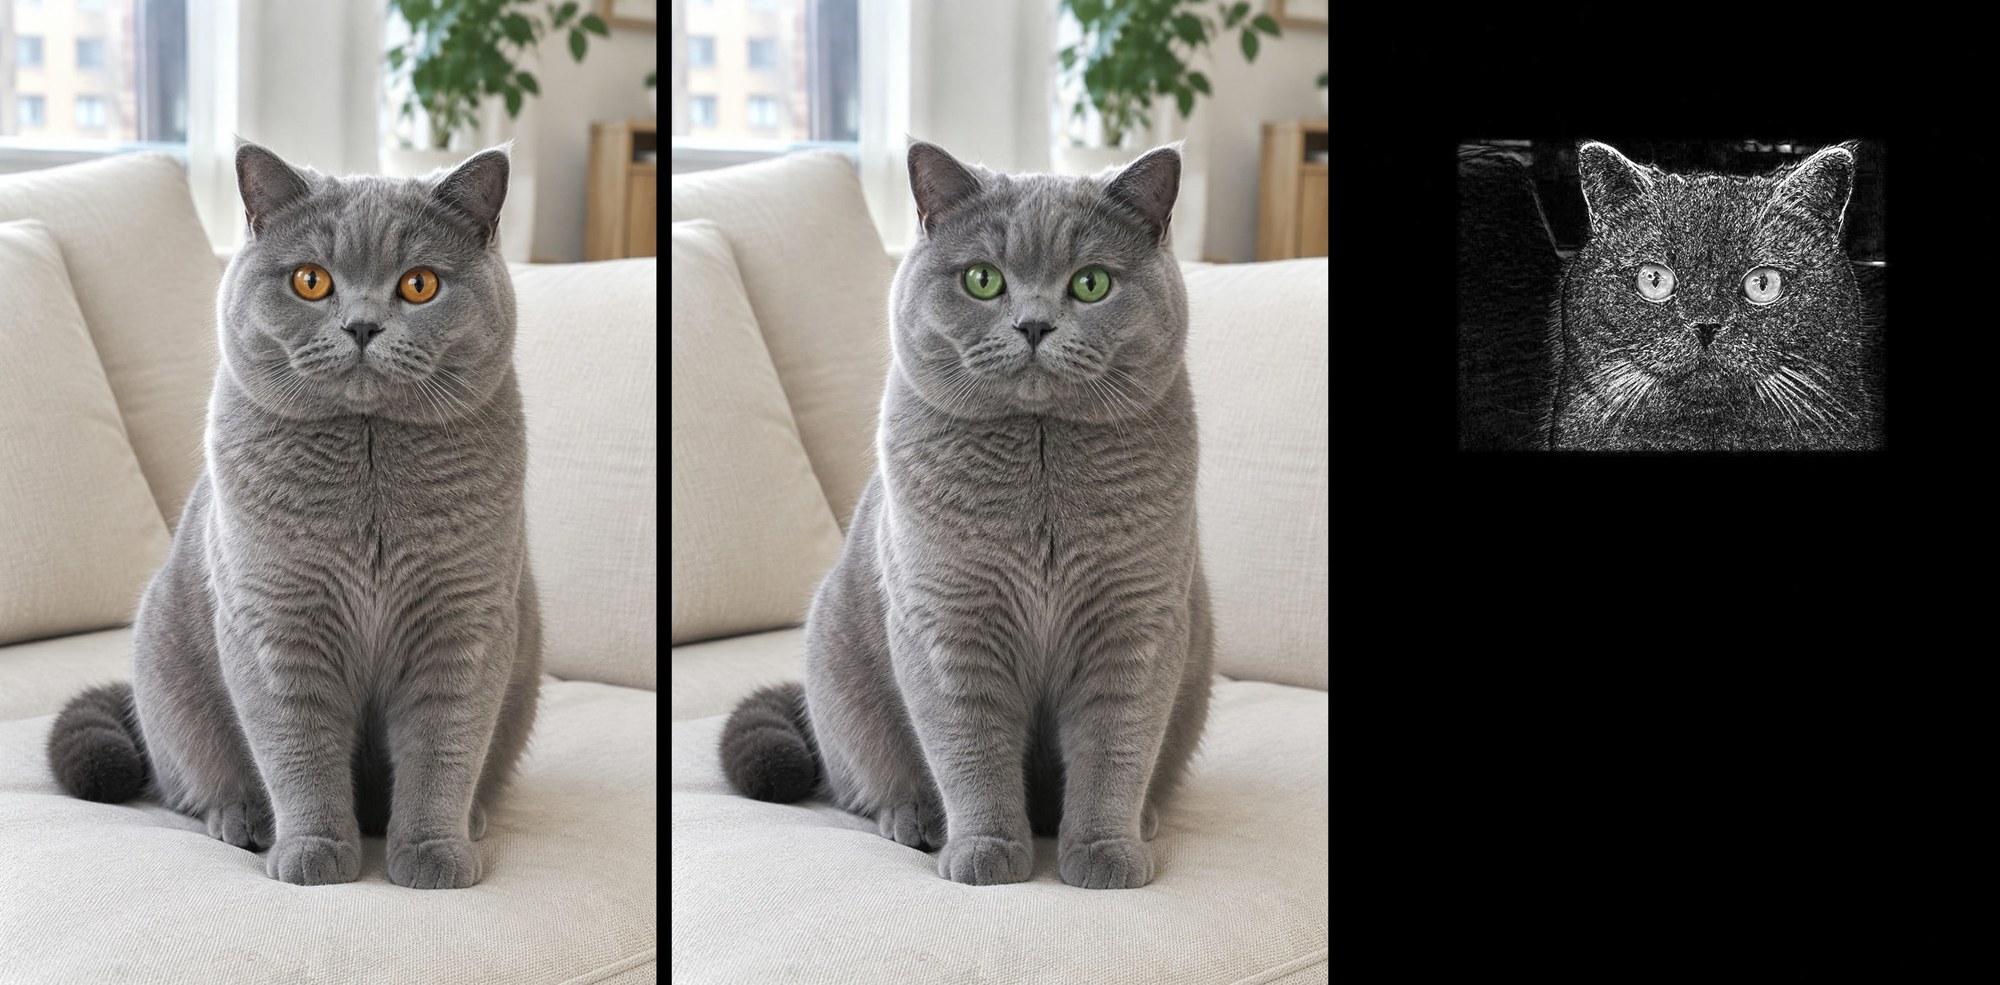
On our cat edit, a 1024×1536 photo where we boxed the eyes and asked for green eyes, we laid the result over the original. Outside the box it came back pixel-identical, so the difference map stays black everywhere but the box.
Make AI Product Photo Variations From One Shoot
One press on our bakery poster gave us six AI product photo variations for the danish's spot at 1K, out of 14 images in that press. The other 8 were 6 headline colours from "Make the headline {gold, deep green, navy blue}" and 2 opening-hours versions from "Change the text to 'OPEN 6AM TO 2PM'".
We got two chocolate éclairs, two lemon tarts and two pistachio macaron stacks. Each one sits on the same baking paper, and the "Raspberry Danish £4.90" tag is untouched beside it.
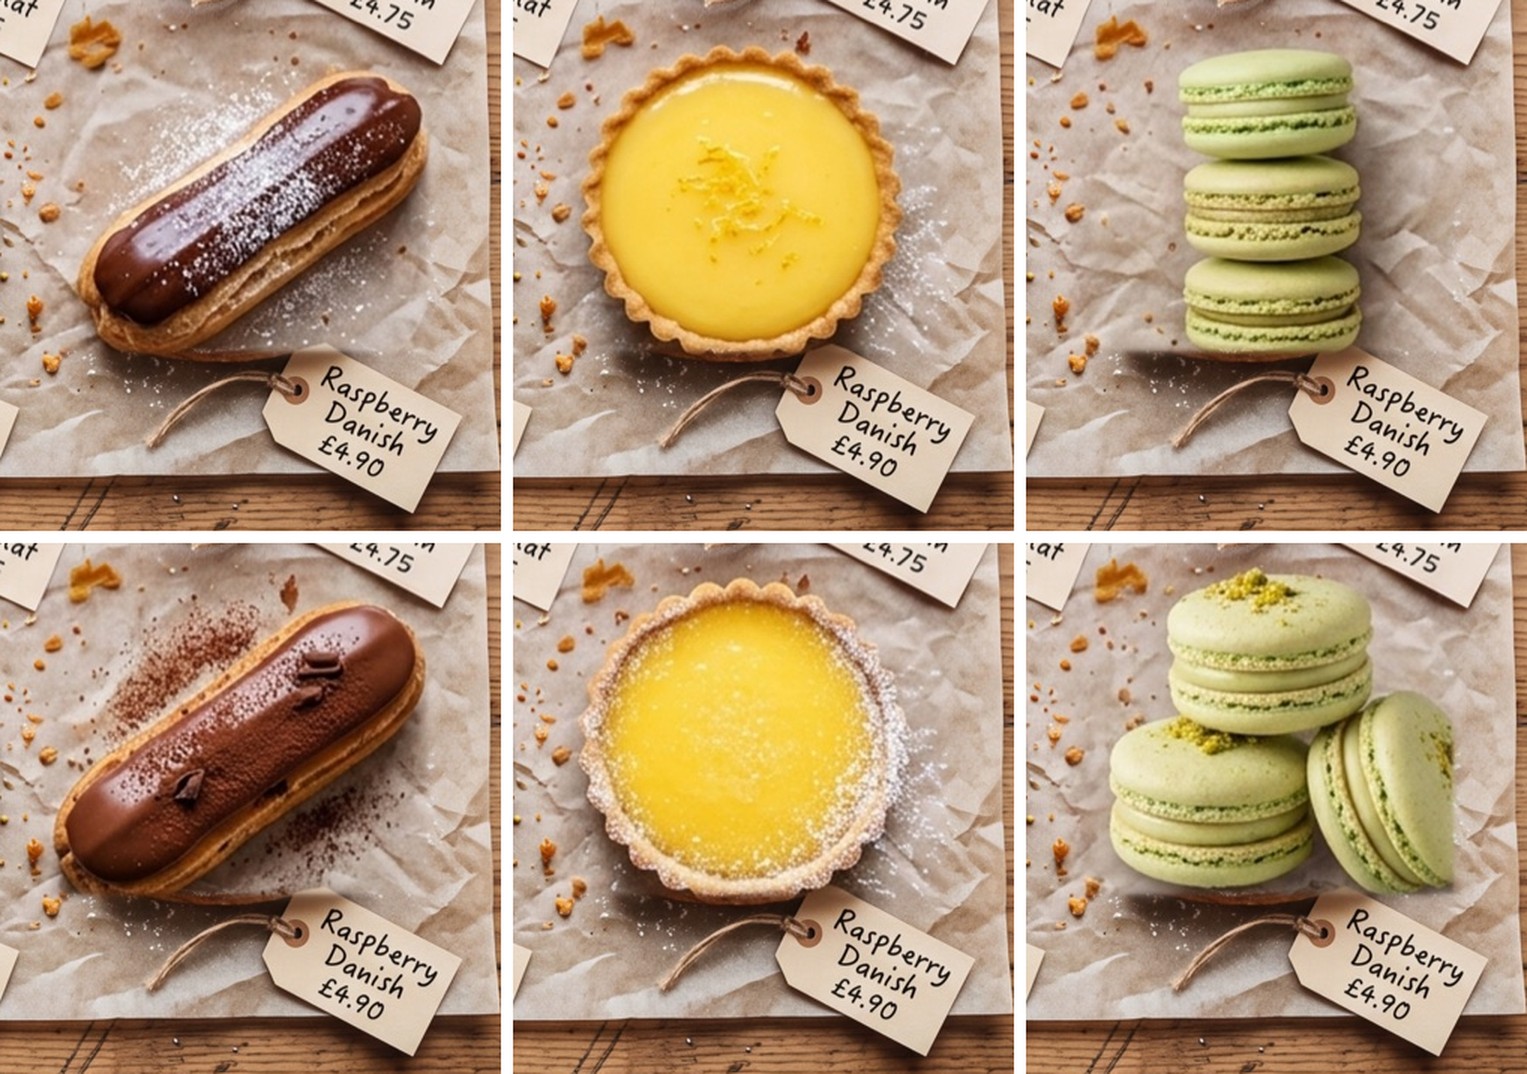
The two versions of each pastry differ in how they're finished. One éclair is dusted with icing sugar and one with cocoa. One macaron stack stands upright, while the other has a macaron leaning against its side.
- One shoot, many products: Keep the set, the light, the labels and the prices from your best photo. Put a different product or flavour in the same spot.
- Ad versions: Run three replacements times two versions in one press, then pick the shots you'll test in your ads.
- Next week's special: Swap one item on a table or poster and leave the rest of the shop window as it is.
- Other changes in the same press: Put up to 8 changes (areas plus whole-image rows) and up to 24 images in one press. You can test headline colours and opening hours alongside your product swap, each on its own copy of the photo.
Settings That Matter When You Swap Product in Photo AI
Five controls in the editor shape how your photos come out when you swap product in photo AI.
- Box size: Draw the box around the product with a little of the baking paper or table around it. That way, the replacement sits naturally on the surface.
- One product per area: Give each product you'd like to replace its own box, its own number and its own "What to change" line.
- 4K: Pick 4K when you upload a high-resolution photo and want the file that comes back to stay big.
- "Change the whole image": Press this button to add a whole-image row (its example is "e.g. Warmer overall tone"). Since each row runs on its own copy, press "Continue editing this one" on your chosen product swap first to put the tone change on top of it.
- "Dim what stays": Turn this switch on while you draw boxes. Everything outside your marked areas darkens so you can check your edges.
Tips for a Clean Product Swap on Your Shop Photos
Three simple habits help you get the exact replacement you want when you swap a product in a photo with AI.
- A plain product name: Write what you want as you'd say it to a person, with one or two details. For example, type "a chocolate éclair" or "a pistachio macaron stack".
- Versions for extra tries: Pick ×2 or ×4 under "Versions" when you'd like more than one look at the same product. That's how we got an icing-sugar éclair and a cocoa-dusted éclair.
- A second edit for the price tag: When the price tag sits outside your product box, press "Continue editing this one" on the swap you like. Draw a box around the tag and write "Change the text to 'Chocolate Éclair £4.90'". Our guide on how to change the text in an image with AI walks through text edits step by step.
Swap Product in Photo AI: Questions Shop Owners Ask
Does the rest of the photo change when I swap a product?
No, the rest of the photo doesn't change when you swap a product in a photo with AI on Seadanse. On our 4K danish swap, the price tags and the other pastries are unchanged. On our cat edit, everything outside the box came back pixel-identical.
How many product versions can I make in one press?
You can make up to 24 images in one press when you swap a product in a photo with AI. A single area line takes up to 6 options in curly braces, and you can pick ×1, ×2 or ×4 versions for each option. You can also line up as many as 8 changes in a single press.
Can I swap a product in a photo online without a design app?
Yes, you can swap a product in a photo online right in your web browser on Seadanse without installing a design app. Upload a JPG, PNG or WebP from your computer, or pick an image from "My creations". You can also use "Upload from phone" to scan a code and grab a shot from your camera roll.
What does a product swap cost?
A product swap costs 7 credits an image at 1K, 11 credits an image at 2K or 16 credits an image at 4K. You'll see the exact image count and credit total above the "Generate" button before you press it. If you've got "Unlimited images" on the Pro plan, 1K edits use 0 credits; check current plan and credit pack details on Seadanse pricing.
Try a Product Swap on Your Own Photo
When you draw a box around a product and write what you want in its place, only that boxed spot changes and everything outside it comes back as it was. Open "Edit an image", choose your photo, box the product, write the replacement and press "Generate" to swap a product in your own photo.
Written by The Seadanse Team. We ran these edits on November 19, 2026.
Related Articles
- How to Edit Only Part of an Image With AI — box one spot, say what to change, and keep the rest of the picture exactly as it was.
- How to Change Text in an Image With AI — fix a headline, a sign or a price tag and keep the rest of the picture as it was.


