
How to Edit Only Part of an Image With AI (8 Steps)
How to edit only part of an image with AI: box the area on Seadanse, write what to change, and everything outside the box comes back exactly as it was.
 The Seadanse Team19 min read
The team behind Seadanse. We run the models we write about, and we publish the specs, prices and limits the marketing leaves out.

TL;DR — To edit only part of an image with AI, open "Edit an image" in Seadanse's AI Image Creator, box the area, write what to change, and compare the result with the original — 4 moves. Everything outside the box comes back exactly as it was; in our cat-eyes test (a 1024 × 1536 photo, green eyes), the pixels outside the box matched the original one for one. One press can give you up to 24 images, with up to 6 options in one line and ×1, ×2 or ×4 versions.
You ask an AI tool to change one thing in a picture, and the whole picture comes back redrawn. Faces, letters and backgrounds shift, so you can't tell what else moved.
The fix is to mark the part that can change and leave the rest alone.
You draw a box over that spot, type the change, and the editor keeps the rest of your photo intact.
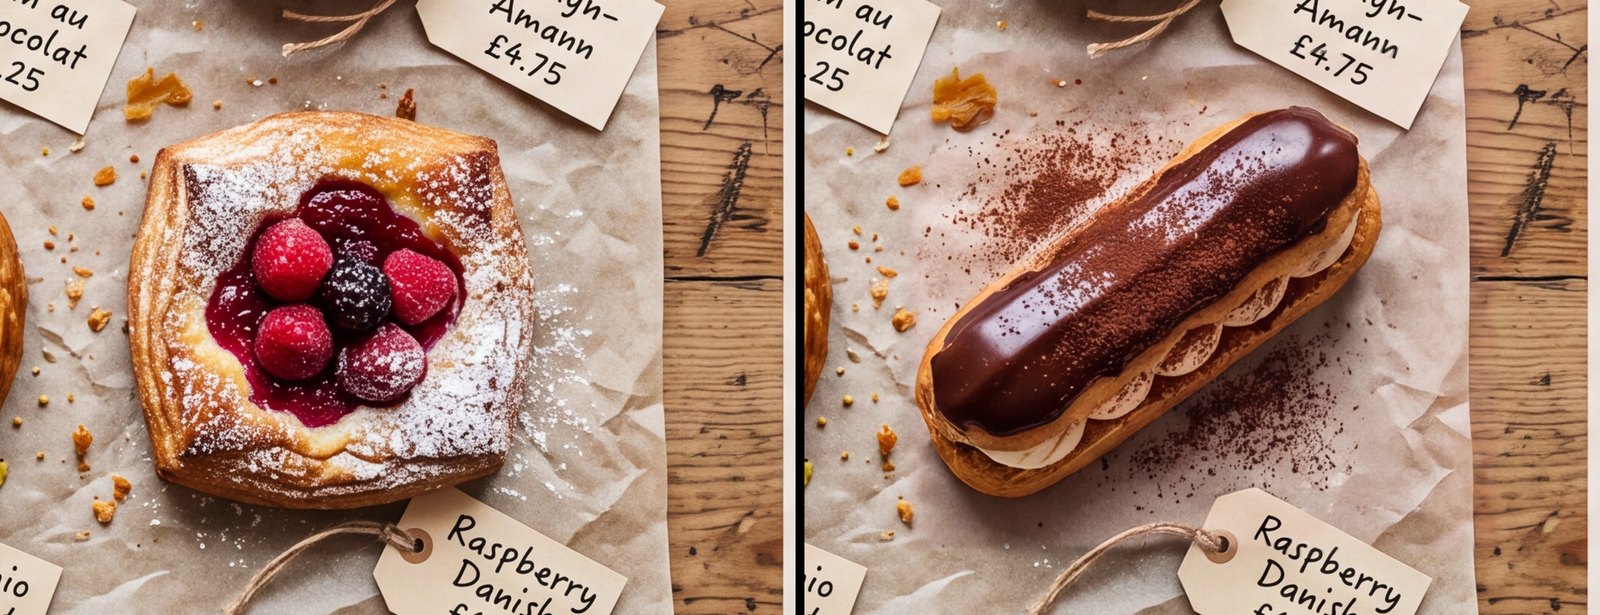
We swapped a raspberry danish for a chocolate éclair at 4K on a bakery poster, and every price tag around it came back untouched.
Why a Prompt Alone Won't Edit Only Part of an Image
An AI image tool that gets only a prompt redraws the whole picture to make the change you ask for.
When the whole picture is redrawn, parts you didn't ask about can shift.
On November 19, 2026, we opened five online Nano Banana image editors while signed out. All five showed a prompt box and no area tool, so you couldn't mark a single spot to change.
Our guide on why Nano Banana changes the whole image breaks down why a text prompt alone touches every corner of a photo.
A box in Seadanse's editor tells the AI where it can draw, and after the AI draws, the editor puts everything outside the box back from your original.
What You Need to Edit Only Part of an Image With AI
Editing part of an image with AI on Seadanse takes three things before you start.
You don't need desktop software to do AI inpainting online (where the AI redraws only a part of the picture you mark).
- An image: Upload a JPG, PNG or WebP from your computer or phone, or pick an image you already made on Seadanse.
- A Seadanse account: You sign in to generate; the button reads "Sign in to generate" when you're signed out.
- Credits or Unlimited images: Each image uses 7, 11 or 16 credits (the site's own currency for each image) at 1K, 2K or 4K. Or it uses no credits with "Unlimited images", which is "Included with Pro at 1K" on Seadanse pricing.
Once you have those ready, you can open the image editor in the AI Image Creator and mark your first spot.
Step 1: Open the AI Image Creator and Pick "Edit an Image"
The AI Image Creator page at seadanse.com/ai-image is where you start every partial edit. Under "Start here", you'll see three tabs:
- Video: Opens the video tools.
- Image: Opens the image tools, which is the tab you pick here.
- Agent: Opens the agent view.
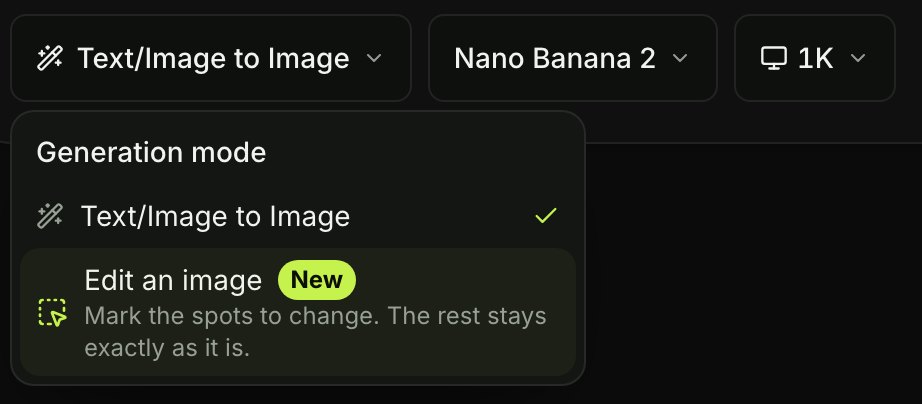
Click the mode menu that reads "Text/Image to Image". Under "Generation mode", you'll see two items: "Text/Image to Image" and "Edit an image".
Pick "Edit an image", which carries the line "Mark the spots to change. The rest stays exactly as it is."
Step 2: Choose the Image You Want to Edit
The "Choose an image to edit" window opens when you pick "Edit an image". The line at the top reads "Upload one or pick one you made. The editor opens with it."
You've got three ways to bring your picture in:
- Uploads: Click "Upload media" in the "Uploads" tab to pick a JPG, PNG or WebP from your computer.
- My creations: Pick an image you already made on Seadanse (when you're signed in, you'll also see "Studio").
- Upload from phone: Under "Photos on your phone? Scan a code and pick them from your camera roll.", click "Upload from phone" to scan a code and pick from your camera roll.
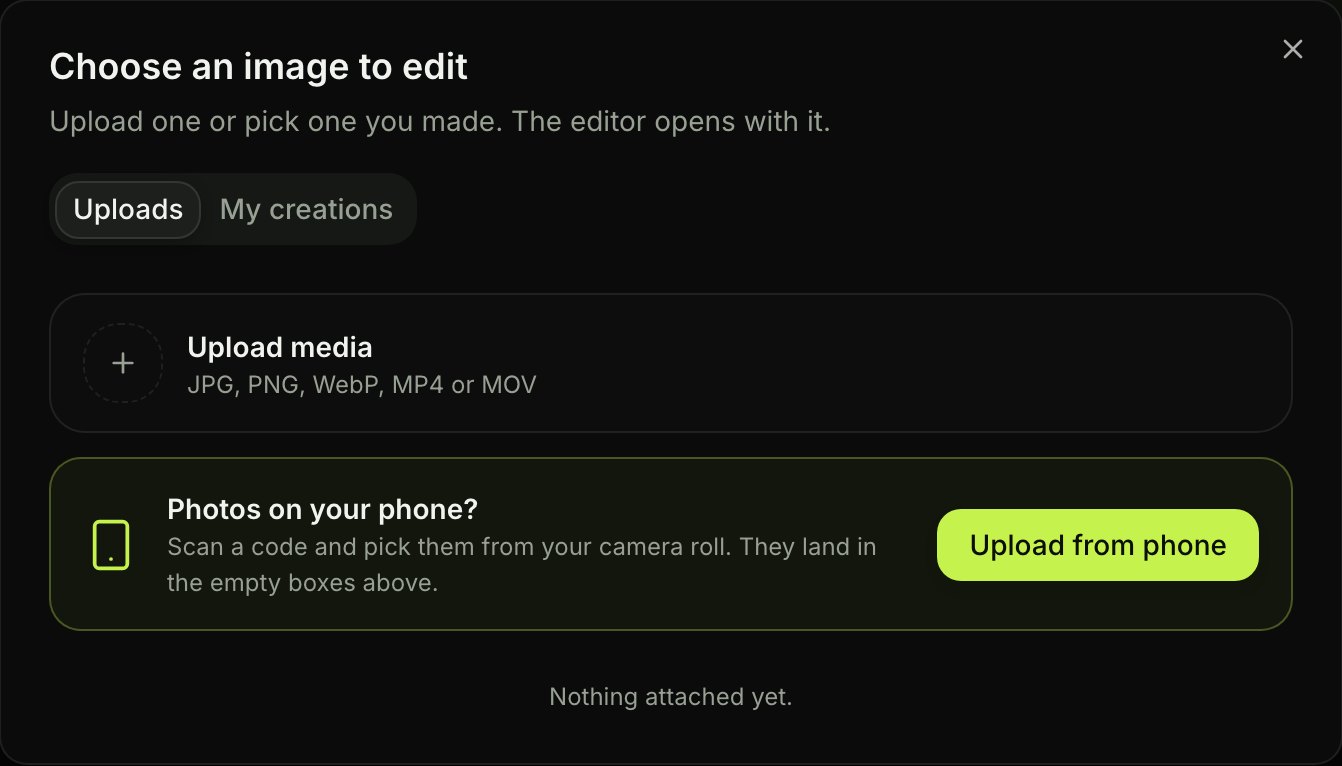
Once you pick a file, the editor opens with your image and the panel "Edit this image".
Step 3: Box the Part of an Image You Want to Change
The "Box" tool on the left side of the "Edit this image" editor lets you mark the exact spot you want to change. Other editors use a brush or a selection tool to mark an area, while on Seadanse you mark it with a box.
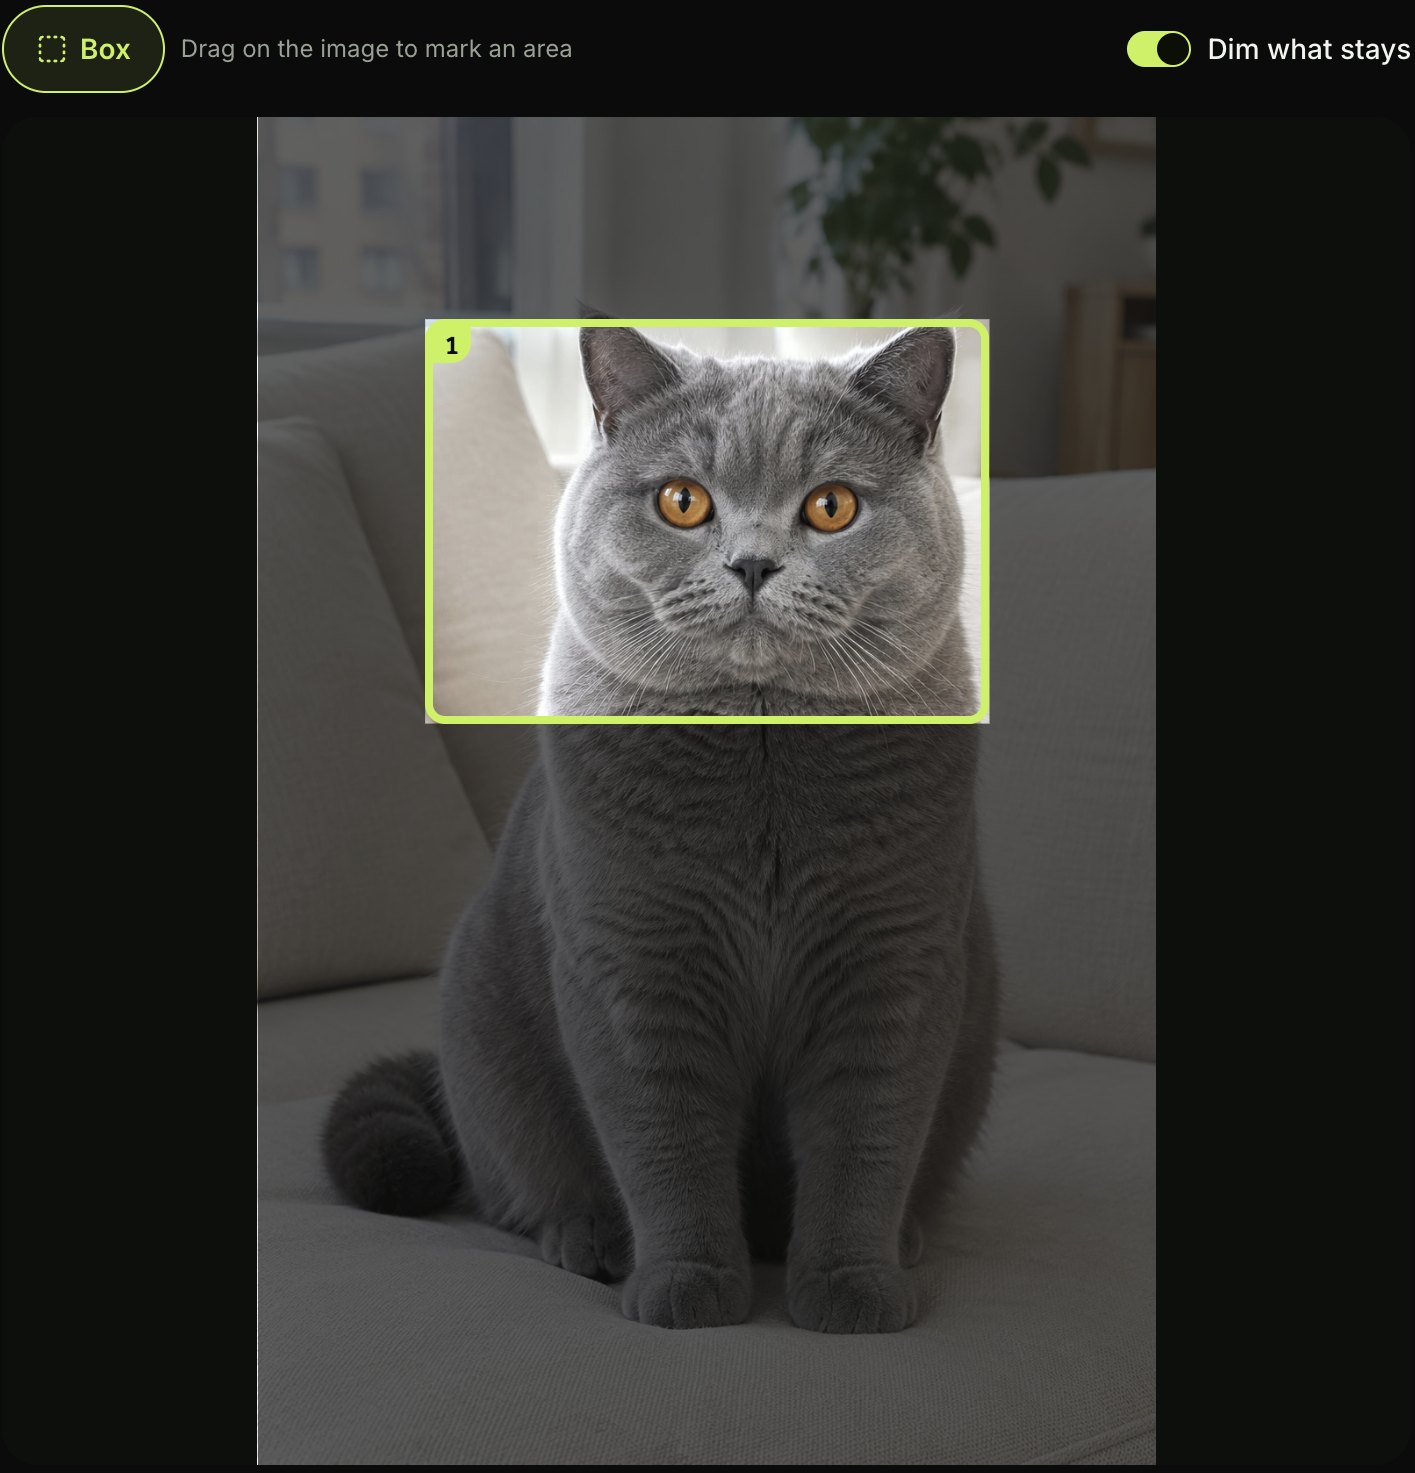
You'll see your image with the tool "Box" and the hint "Drag on the image to mark an area". Drag across the part of the photo you want to edit, and each box you draw gets a number: 1, 2, 3.
Turn on the "Dim what stays" switch to darken everything outside your boxes, so you see at a glance what can change. You can add up to 8 changes in one press, counting your boxes and whole-image rows together. Only what you mark in a box can change while the rest of the photo stays untouched.
Step 4: Write What to Change in That Area
The "What to change" list on the right side of the editor holds the instructions for every box you draw. Each box gets its own numbered row, such as "Area 1" or "Area 2", with a text line where you type what you want.
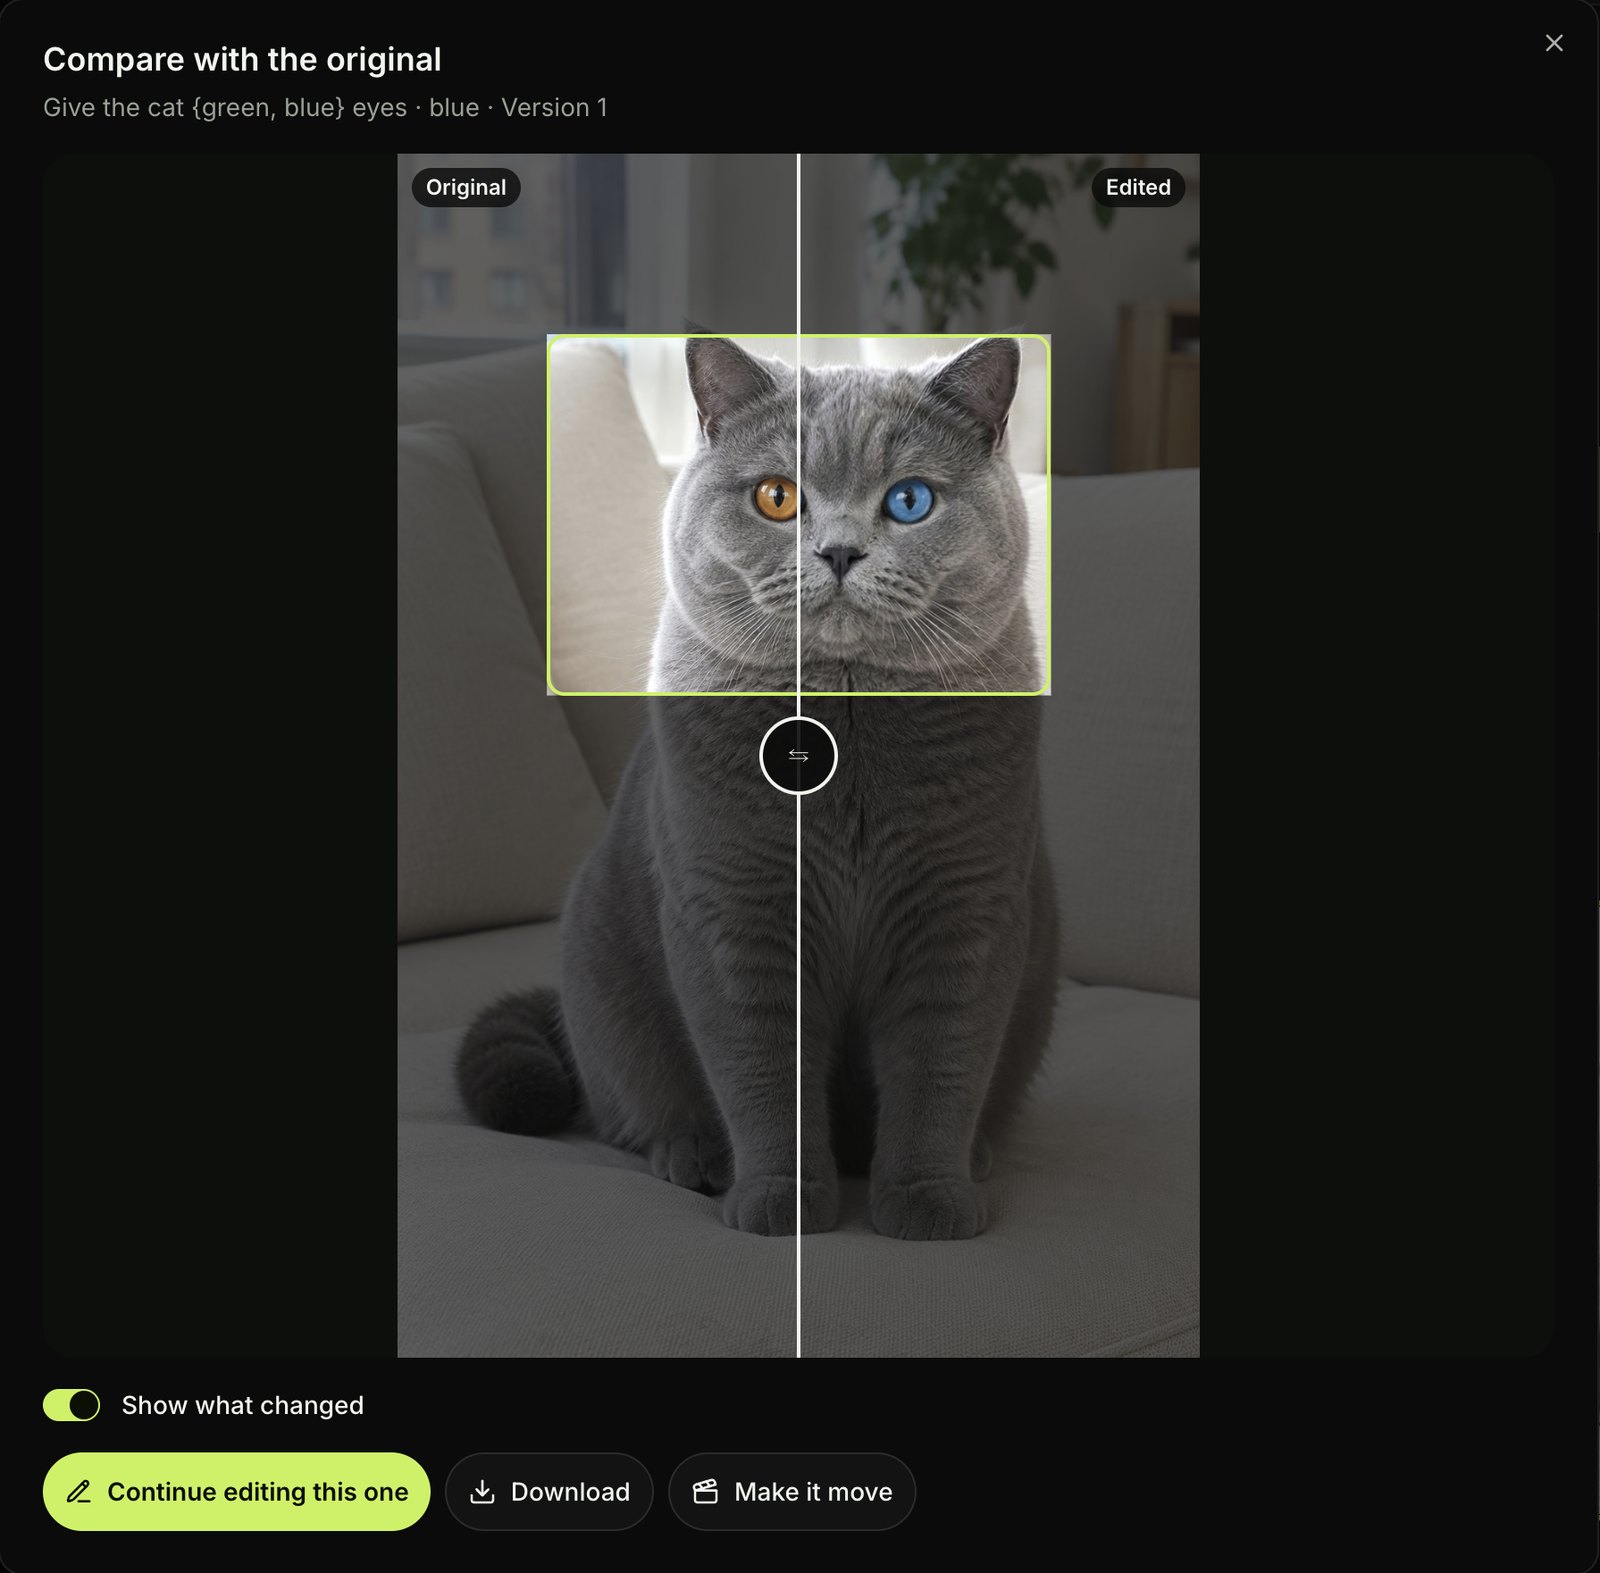
For our grey cat test, we drew one box over the cat's face and typed "Give the cat {green, blue} eyes" in the "Area 1" row. Right in the panel, you'll see the editor's promise: "Only what you mark can change. Mark an area and say what to change in it. Everything outside the area comes back exactly as it is."
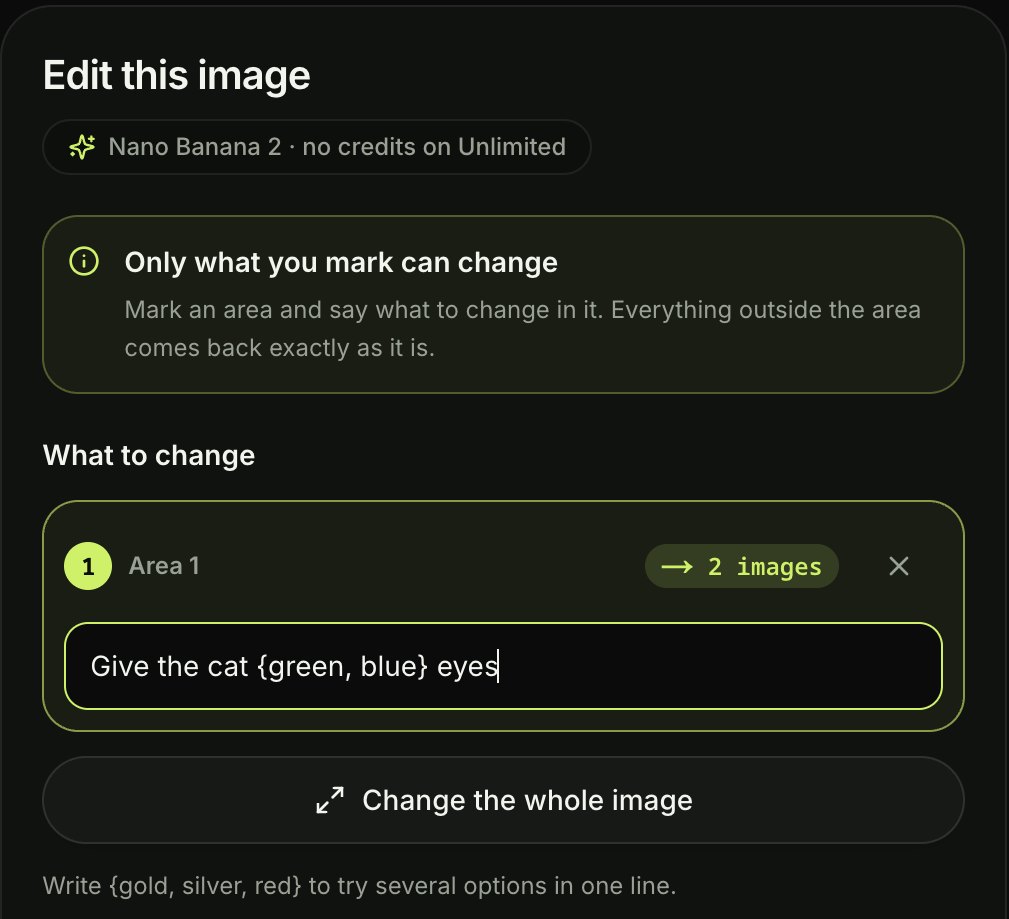
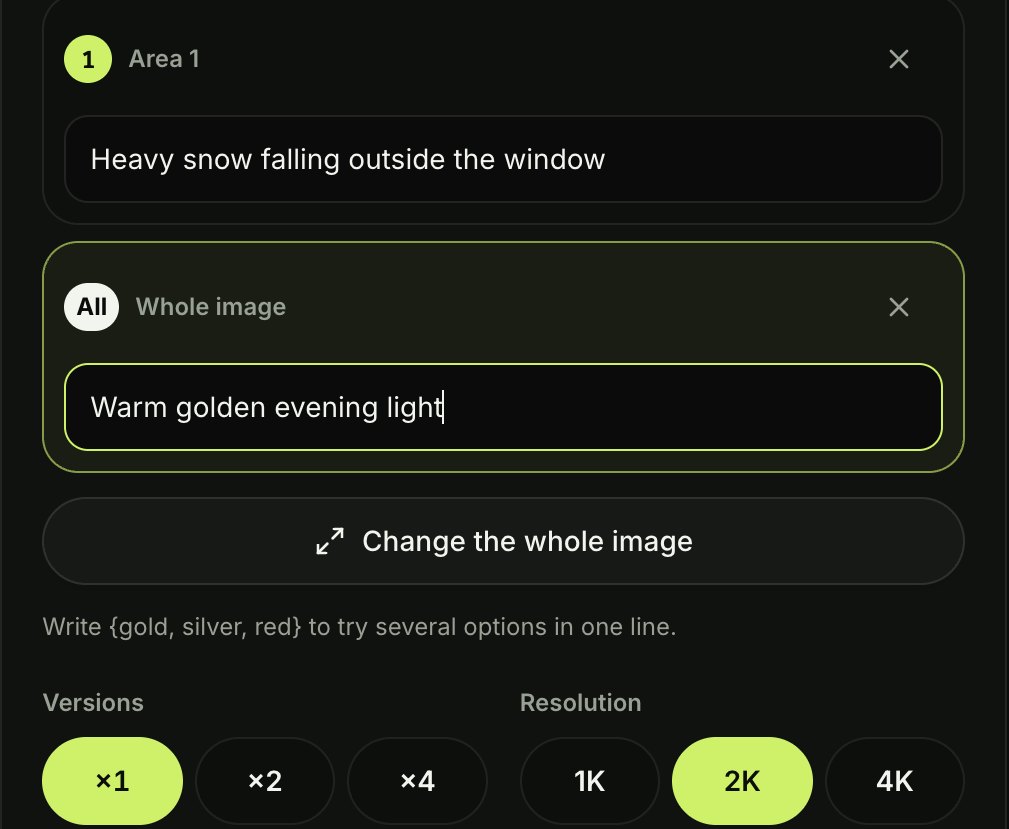
If you also want a change across the entire picture, click "Change the whole image" to add a "Whole image" row (the placeholder suggests "Warmer overall tone") and type a line like "Warm golden evening light".
Step 5: Add Options and Versions to Get Variations of an Image
Options and versions in the "Edit this image" panel let you test several ideas without retyping your prompt. You write your choices inside curly braces in one line, like {gold, silver, red}, following the panel's hint: "Write {gold, silver, red} to try several options in one line."
Here's how the math works when you set up your run:
- Options in braces: Put up to 6 options in one pair of braces, and each option becomes its own image. A chip on the row shows the count, such as "→ 2 images" or "→ 6 images".
- Versions: Pick ×1, ×2 or ×4 versions, where a version is one more try at the same change.
- Separate copies: The confirm window notes that "Each change is tried on its own copy of the image.", so three changes give you three separate results, up to 24 images in one press.
Step 6: Pick 1K, 2K or 4K and Press Generate
The resolution picker and the Generate button sit at the bottom of the "Edit this image" panel. The editor runs Nano Banana 2, and the model label reads "Nano Banana 2 · 7 credits/image" when you're at 1K.
You pick from three sizes before you press the button:
- 1K: Uses 7 credits an image, or no credits when you turn on "Unlimited images" ("Included with Pro at 1K", where the label reads "Nano Banana 2 · no credits on Unlimited").
- 2K: Uses 11 credits an image.
- 4K: Uses 16 credits an image.
Before you press, the summary line shows the exact count of images and credits, such as "2 images · 22 credits" for one box plus one whole-image row at 2K, and the button reads "Generate 2 images". A confirm window then lists each change with its images and credits.
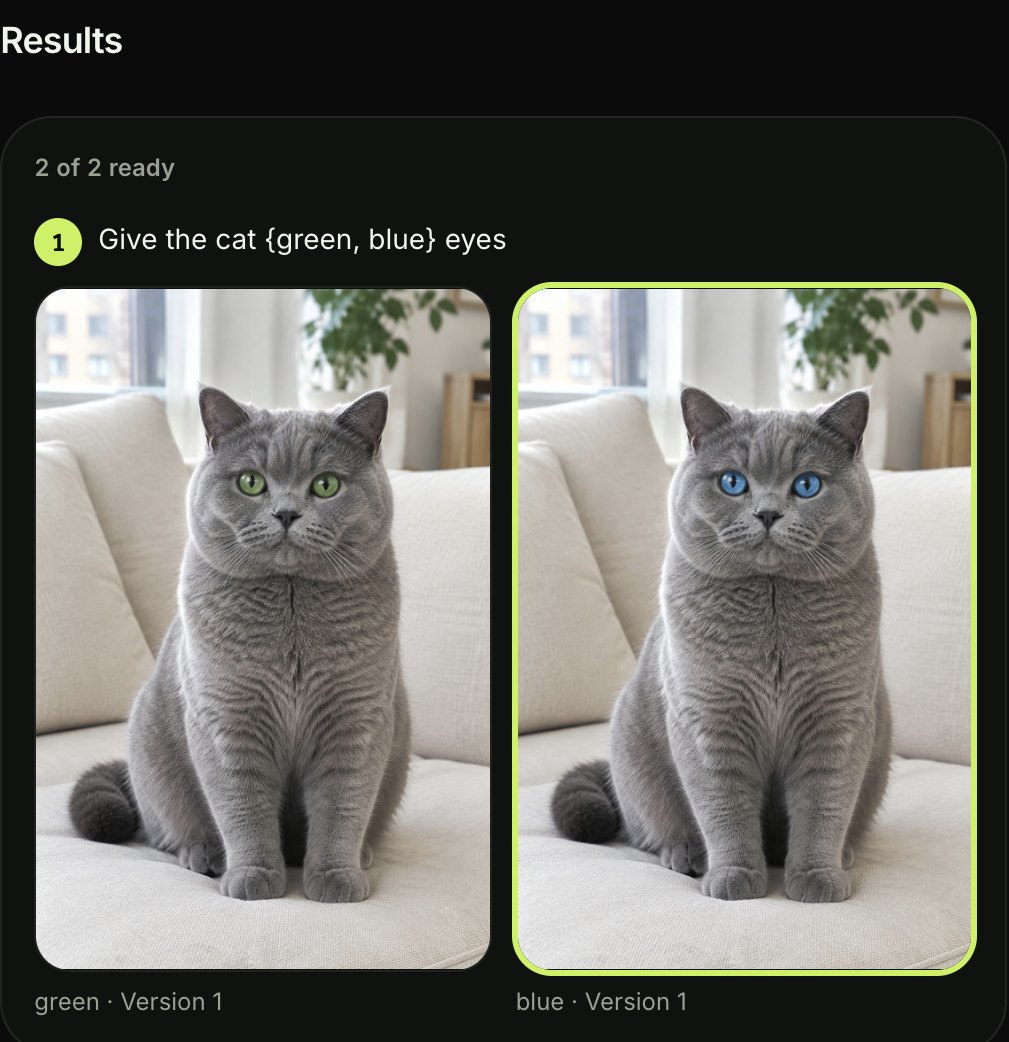
Your finished pictures appear under "Results" with a count like "2 of 2 ready", and each one is labelled with its option and version, such as "green · Version 1" and "blue · Version 1".
Step 7: Compare With the Original to See Which Part of an Image Changed
The "Compare with the original" view lets you check that only your boxed area changed when you edit only part of an image with AI. Click any result under "Results" to open "Compare with the original", and drag the divider back and forth between "Original" and "Edited".
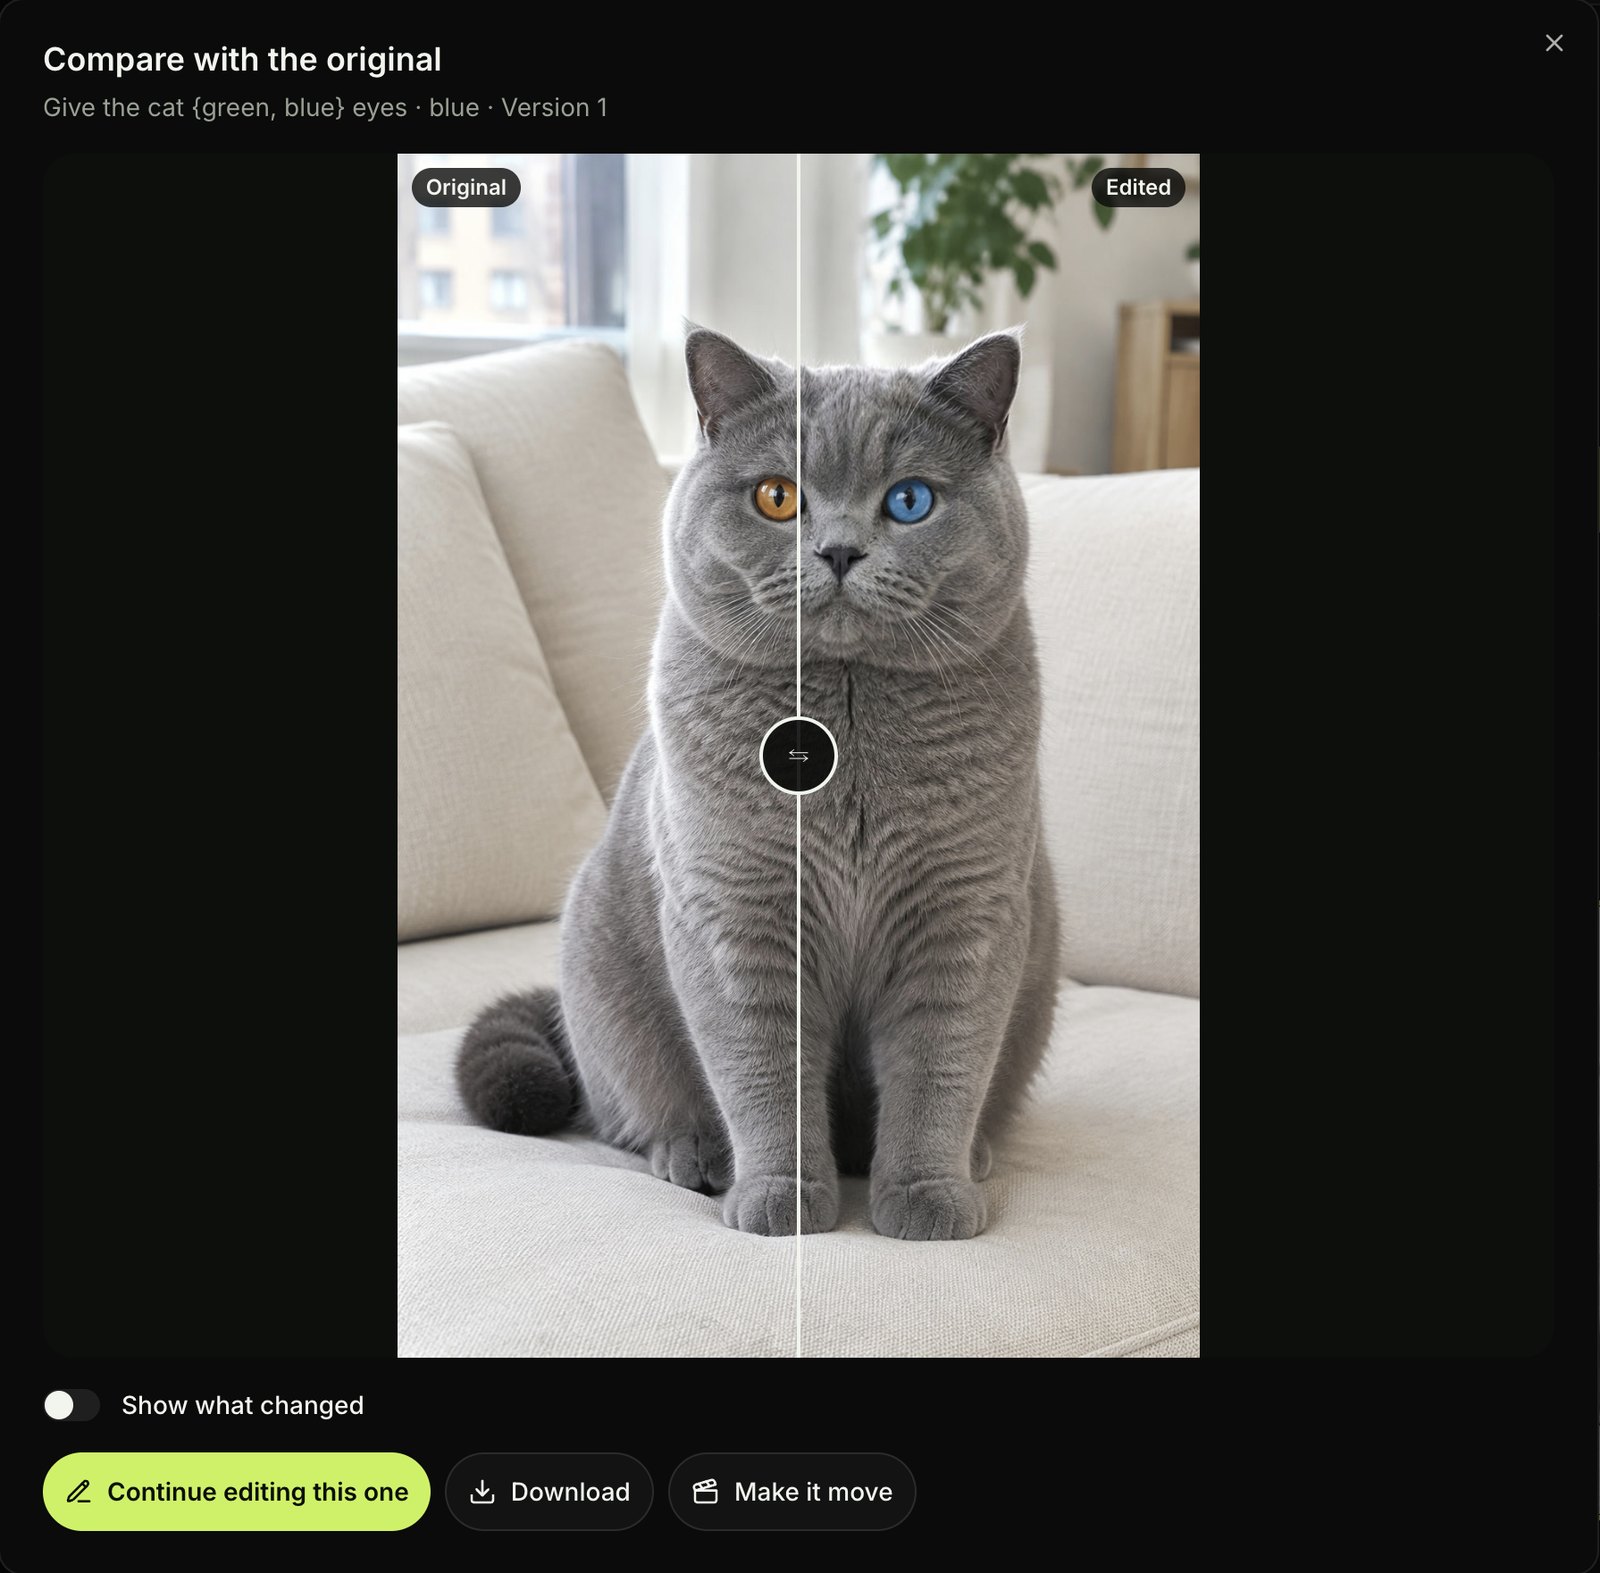
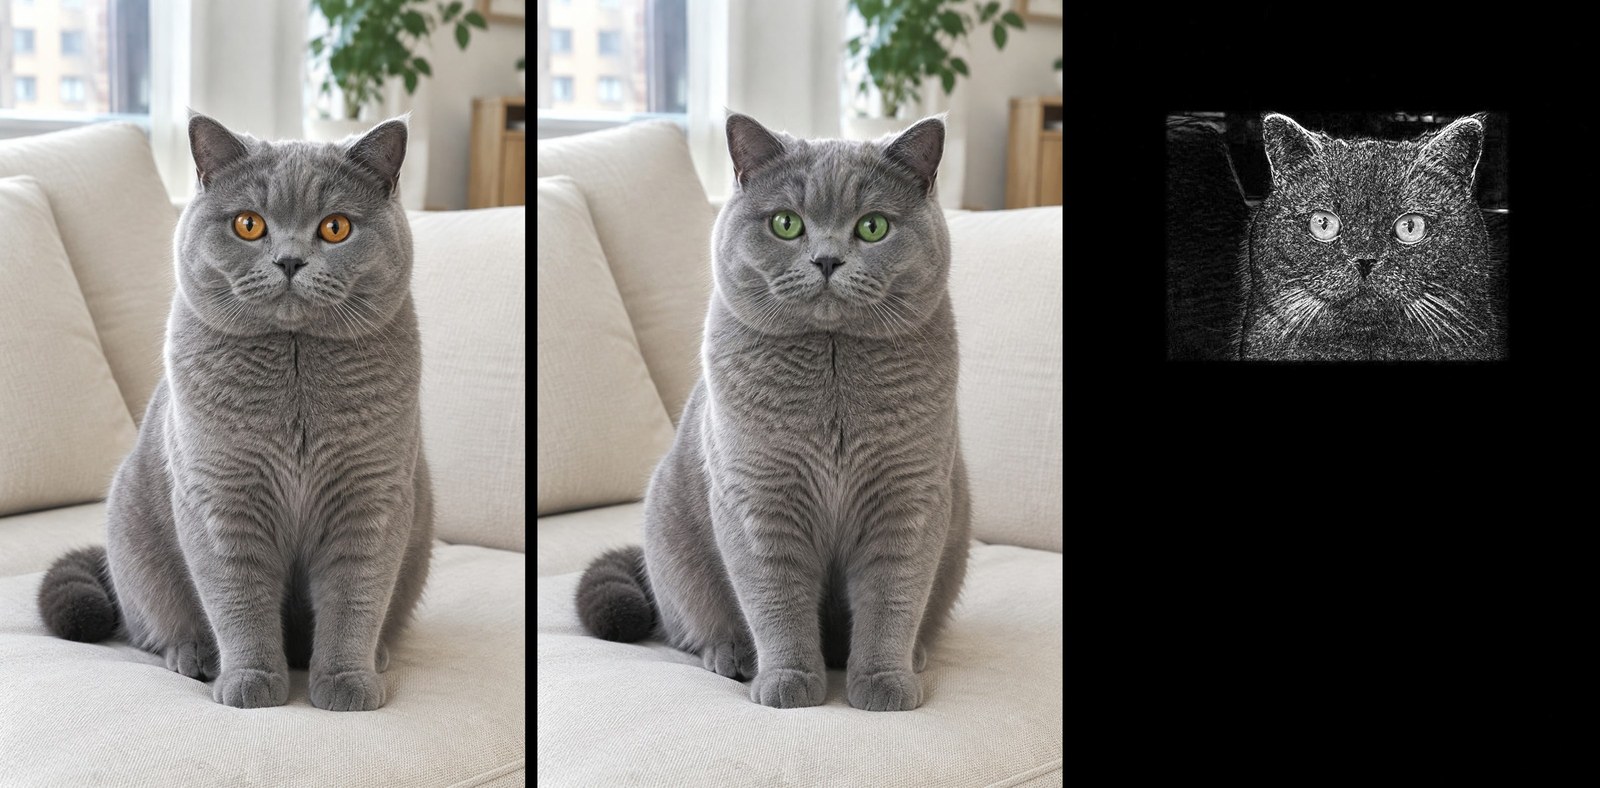
Flip on "Show what changed" to light up the pixels that changed and darken the rest of the picture. In our cat test, only the boxed face lit up while the room and window stayed dark.
We measured our cat's green-eyes result against the original at full size. Outside the box, 99.5% of the pixels were exactly equal, so the picture matched the original pixel for pixel and didn't move even by one shade. The difference map below is black everywhere outside the box. On our bakery poster runs, the rest of the poster stayed as it was too.
Step 8: Continue Editing This One
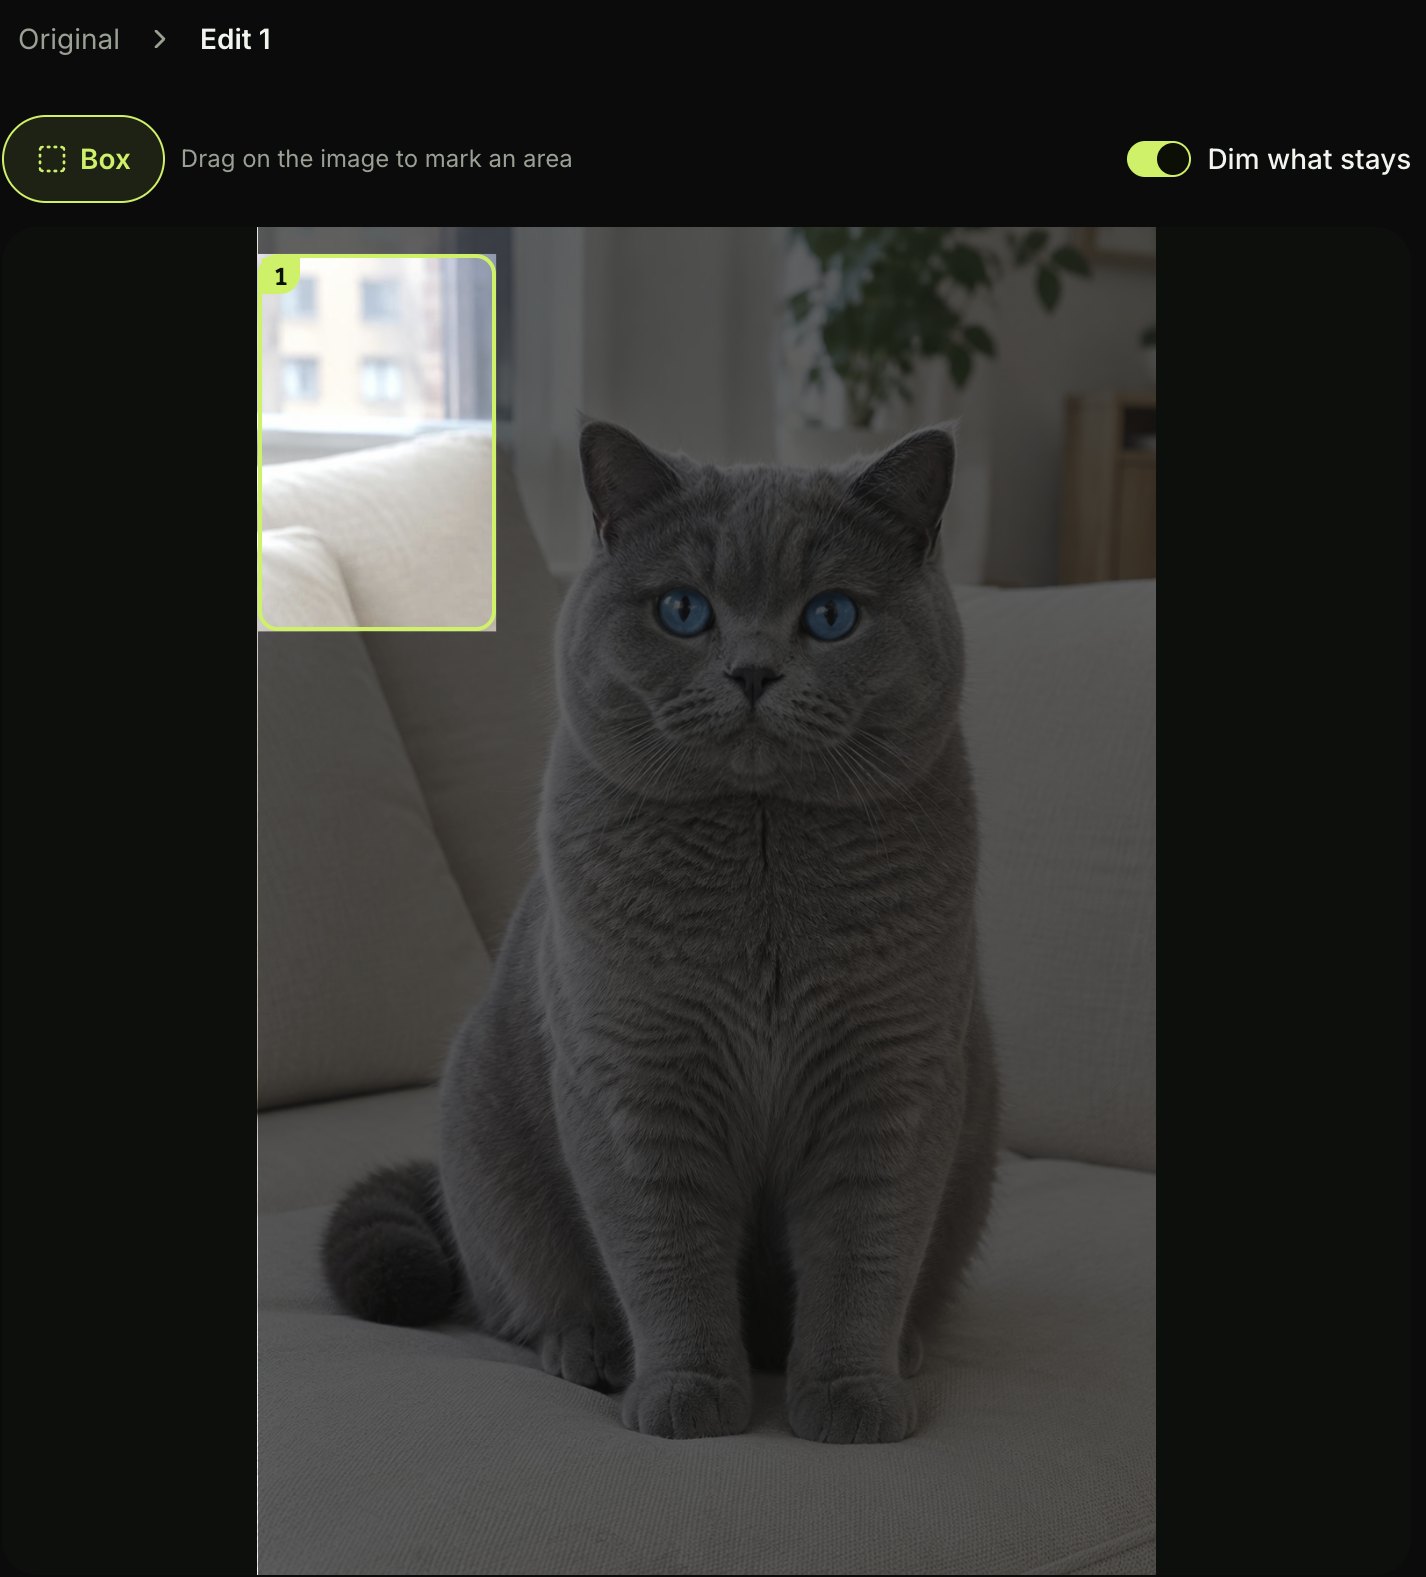
The "Continue editing this one" button lets you stack a second change onto your favorite result.
Because each change in a single press runs on its own copy of the image, you use "Continue editing this one" when you want to build a chain of edits on one picture.
When you click it, the editor starts the next edit from that result and builds an "Edit history" trail at the top: "Original › Edit 1 › Edit 2". From any result, you also have two other actions:
- Download: Saves the finished image to your device.
- Make it move: Opens Seadanse's video composer with the image attached, so you can turn your edited picture into a video.
Generate Multiple Variations of an Image in One Press
One press in the editor can generate multiple variations of an image across several boxed areas. On November 19, 2026, we loaded a 5504 × 3072 bakery window poster that read "FRESH EVERY MORNING" and "OPEN 7AM TO 3PM" with six pastries and their price tags, and we drew three boxes:
- Area 1 (the headline): We typed "Make the headline {gold, deep green, navy blue}", which gave us 3 options and showed the chip "→ 6 images" with versions set to ×2.
- Area 2 (the raspberry danish): We typed "Replace the raspberry danish with a {chocolate éclair, lemon tart, pistachio macaron stack}", which gave us 3 options and showed "→ 6 images" at ×2 versions.
- Area 3 (the opening hours): We typed "Change the text to 'OPEN 6AM TO 2PM'", which was 1 change that became 2 images at ×2 versions.
Three areas, three options in two of them and one change in the third make 7 changes to try. Multiplying by ×2 versions gives 14 images from one press, so you get every variation to compare side by side.
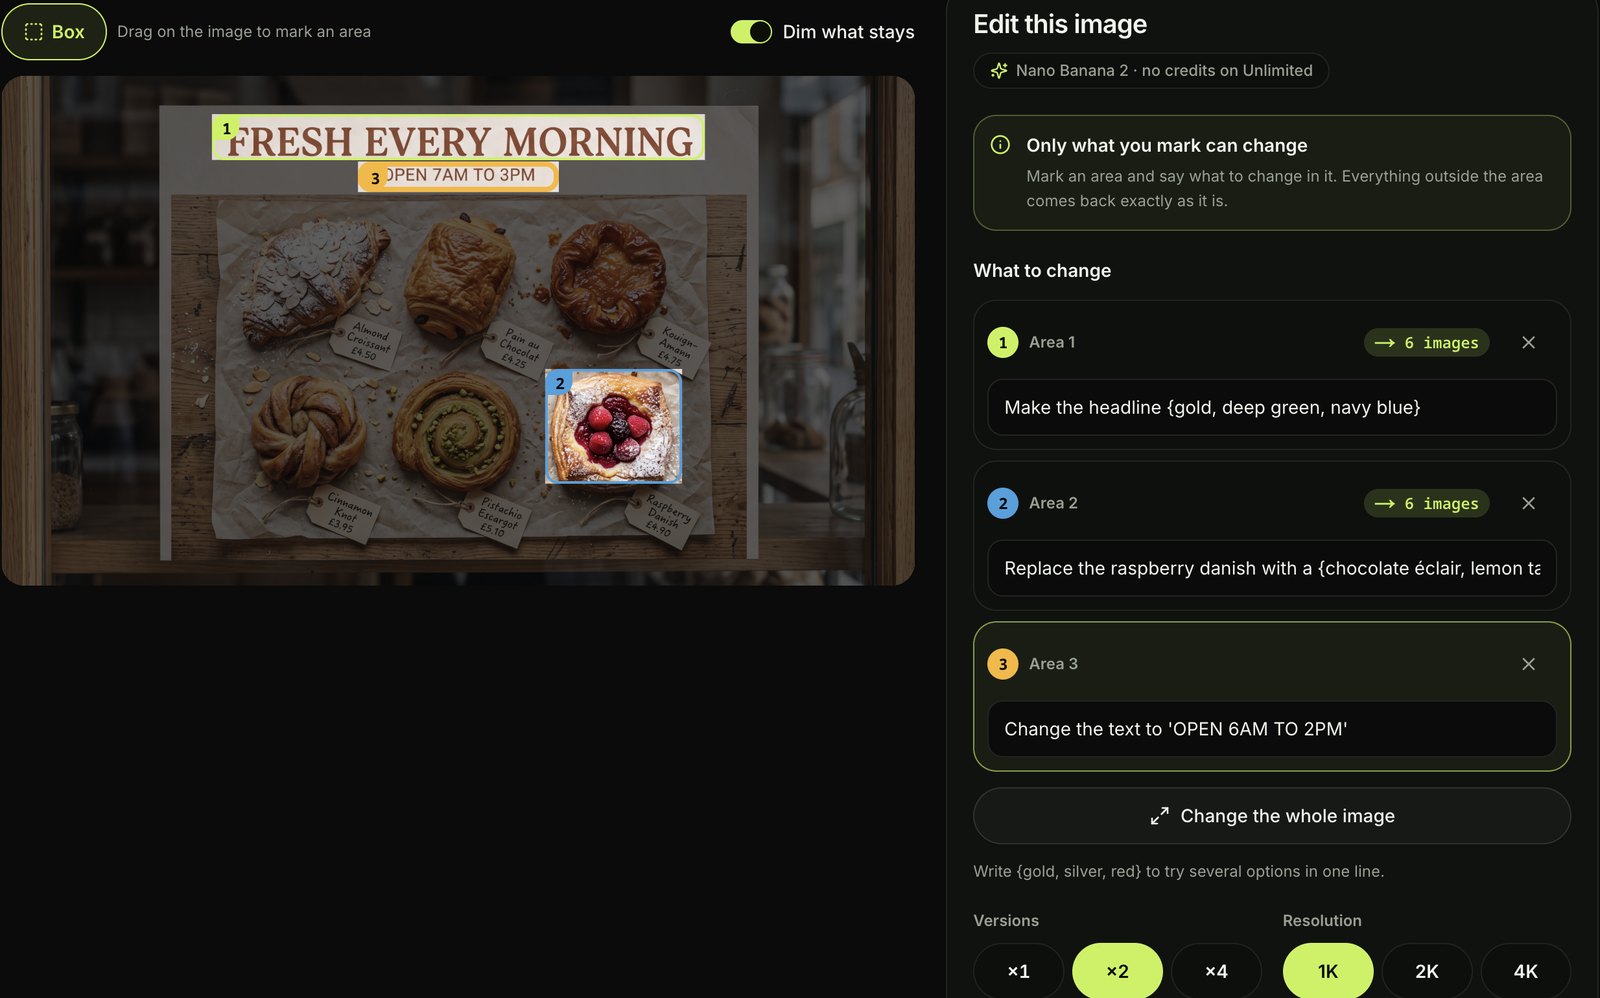
With "Unlimited images" turned on at 1K, the summary line read "14 images · 0 credits" and the button read "Generate 14 images". Before generation started, the confirm window listed each change with its images and credits.
All 14 images came back at 5504 × 3072, each as a separate picture carrying one change:
- Headline: gold, deep green and navy blue, 2 versions each, same lettering.
- Hours: "OPEN 6AM TO 2PM" in the same font and colour, 2 versions.
- Danish: a chocolate éclair, a lemon tart and a pistachio macaron stack, 2 versions each.
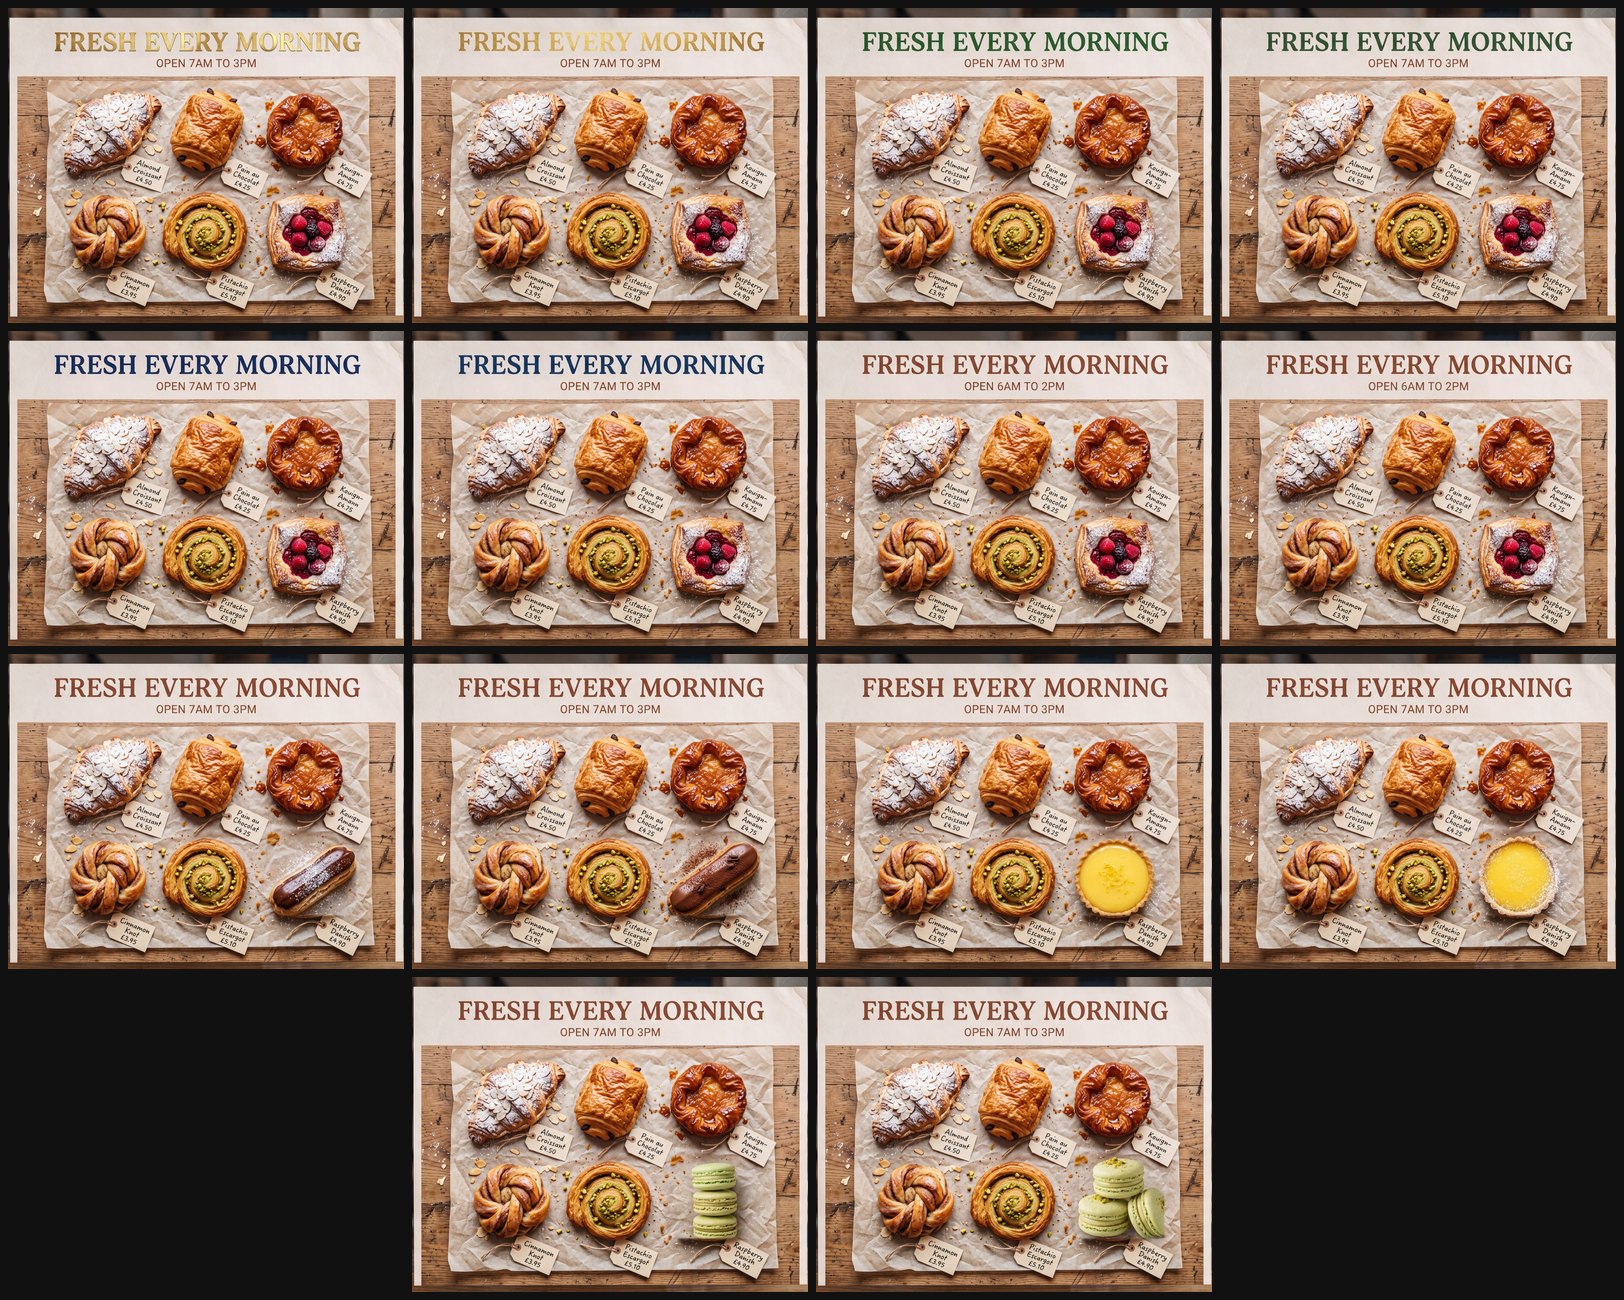
Every other pastry, tag and line on the poster stayed as it was in all 14 images. The tag under the swapped pastries still reads "Raspberry Danish £4.90" because the tag was outside the box. To change a tag's words too, box the tag as its own change.
Try It: Edit Only Part of an Image With AI Today
You can edit part of an image online right in your browser without setting up layers. Open the AI Image Creator, pick "Edit an image", box the part you want to change and write what to change. The rest of your picture stays exactly as it was.
5 Things You Can Change in Only Part of an Image
Five runs we completed in the editor on November 19, 2026 show how you can edit only part of an image with AI across photos and posters. Each run started with a single box or a whole-image row.
Change a Cat's Eyes, Then Keep Going
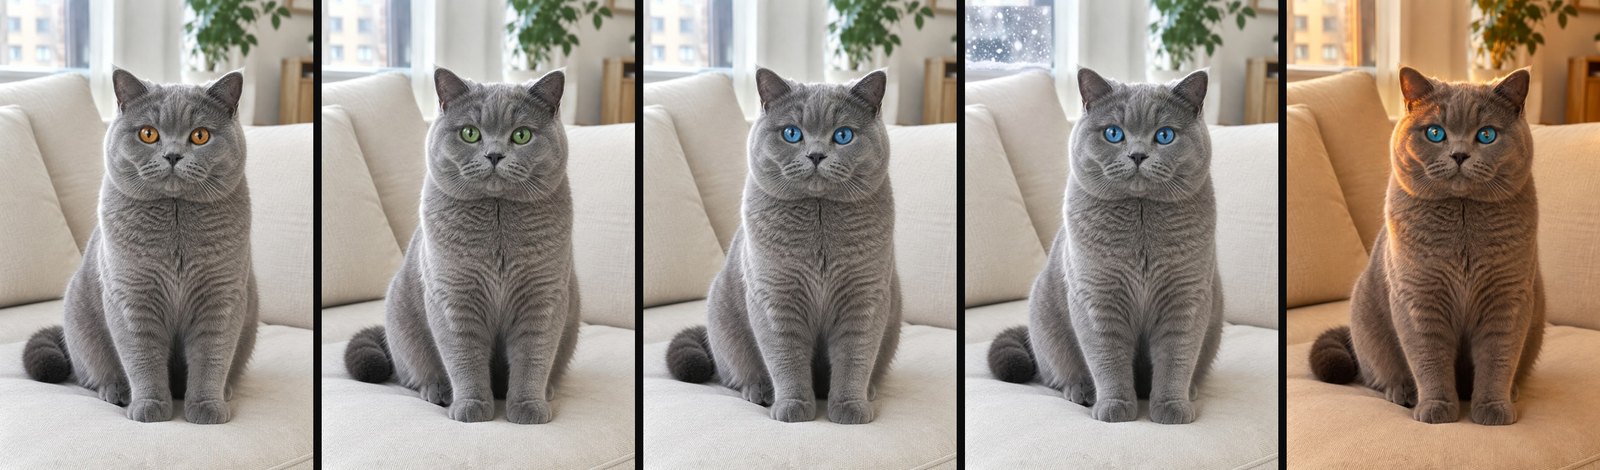
A five-step chain on our grey cat photo shows how "Continue editing this one" stacks partial edits. We started with the original orange eyes, then boxed the face to make green eyes and blue eyes. Next, we clicked "Continue editing this one" on the blue-eyed cat to box the window for heavy snow outside, and finished with warm golden evening light.
Recolour a Poster Headline
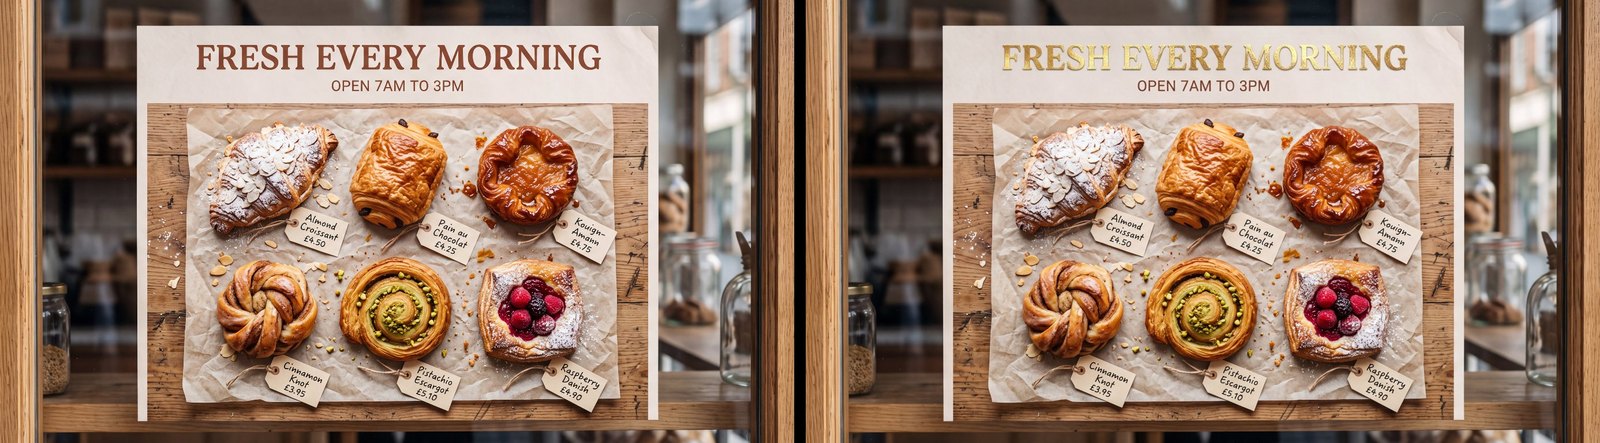
Boxing the headline "FRESH EVERY MORNING" on our bakery poster let us turn the letters gold while keeping the same lettering. All six pastries, their price tags and the opening hours below the headline stayed the same. Our guide on how to change text in an image with AI walks through both colour and wording swaps.
Swap a Product at 4K
Drawing a box around the raspberry danish at 4K (16 credits an image) let us replace it with a chocolate éclair in the same spot on the poster. The 4K result came back at 5504 × 3072, the size of the original poster. Because the price tags around it ("Raspberry Danish" and "Kouign-Amann £4.75") sat outside the box, they came back untouched. See our full walkthrough on how to swap a product in a photo with AI.
Change the Scene Outside a Window
Drawing a box over the window pane behind our grey cat let us change the weather outdoors without touching the cat or the room. We typed "Heavy snow falling outside the window" in the box's row, and only the view through the glass changed.
Change the Light Across the Whole Image
Clicking "Change the whole image" adds a "Whole image" row that works alongside your boxed areas. When we combined the window box with a whole-image row reading "Warm golden evening light" at 2K, the summary read "2 images · 22 credits" and gave us one result for each change.
Settings That Matter When You Edit Part of an Image With AI
Six controls in the "Edit this image" panel decide what changes, how many pictures you get back and how many credits a press uses.
| Setting | Choices | What it means for you |
|---|---|---|
| Box | Drag on the image; up to 8 changes in one press | Only what you box can change |
| Options | Up to 6 in one {…} line | One line, several pictures to pick from |
| Versions | ×1, ×2 or ×4 | More tries at the same change |
| Resolution | 1K, 2K or 4K (7, 11 or 16 credits an image) | Pick the size you'll use |
| Images per press | Up to 24 | Every combination in one go |
| Dim what stays | On or off | See at a glance what can change |
Turning on "Dim what stays" darkens the protected area around your boxes before you press Generate, so you can check your box placement right on the image.
Tips for a Clean Partial Edit
Four habits help you get the exact picture you want when you edit part of an image with AI. Each one matches how the editor processes your boxes and lines.
- Box a little more than the thing itself: The AI can only draw inside the box, so give it the whole object you want changed.
- One change per box: Each box has its own line, and each line becomes its own result.
- Options in braces, not separate presses: Writing {gold, deep green, navy blue} gives three images from one line.
- Stack changes with "Continue editing this one": Each change is tried on its own copy, so build a chain when you want several changes on one picture.
Other Ways to Start Editing Part of an Image
You can also open the "Edit this image" editor directly from a finished image or right after you upload a file in the AI Image Creator. You don't have to switch the mode menu first if you're already working on a picture:
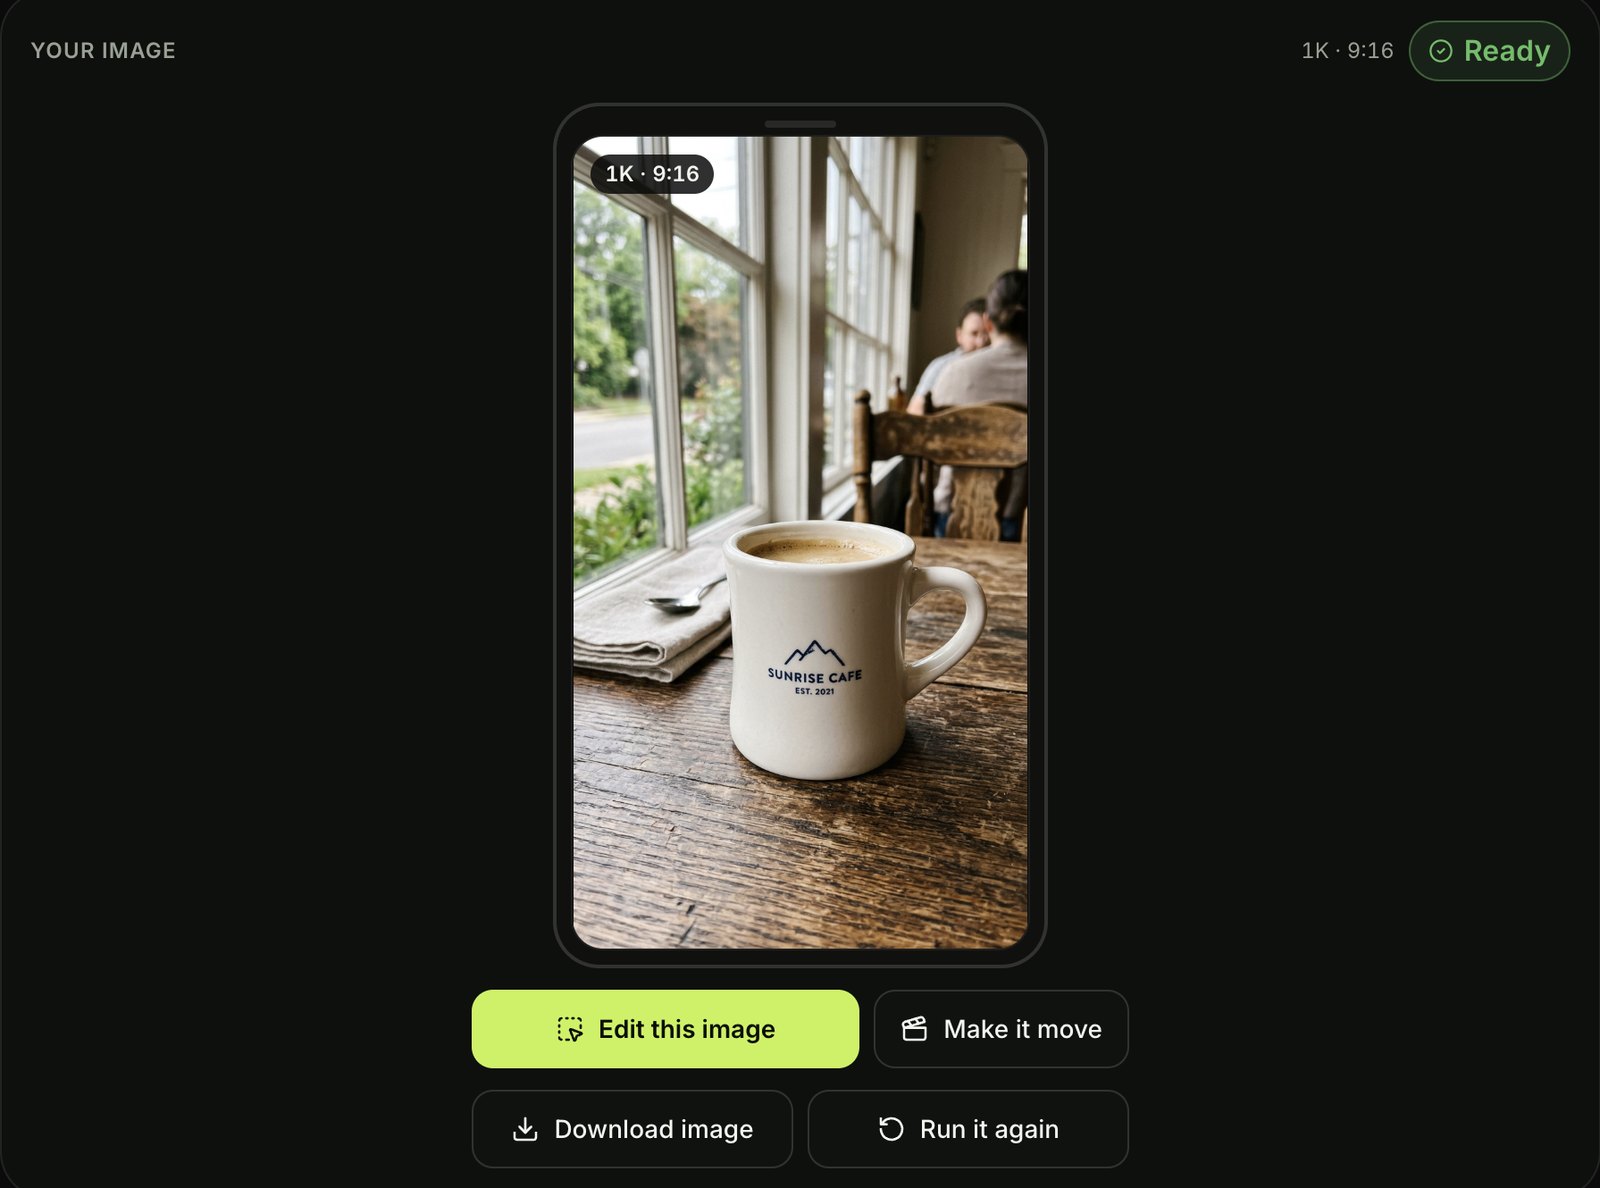
- Under a finished image: Click the "Edit this image" button that sits right next to "Make it move", "Download image" and "Run it again".
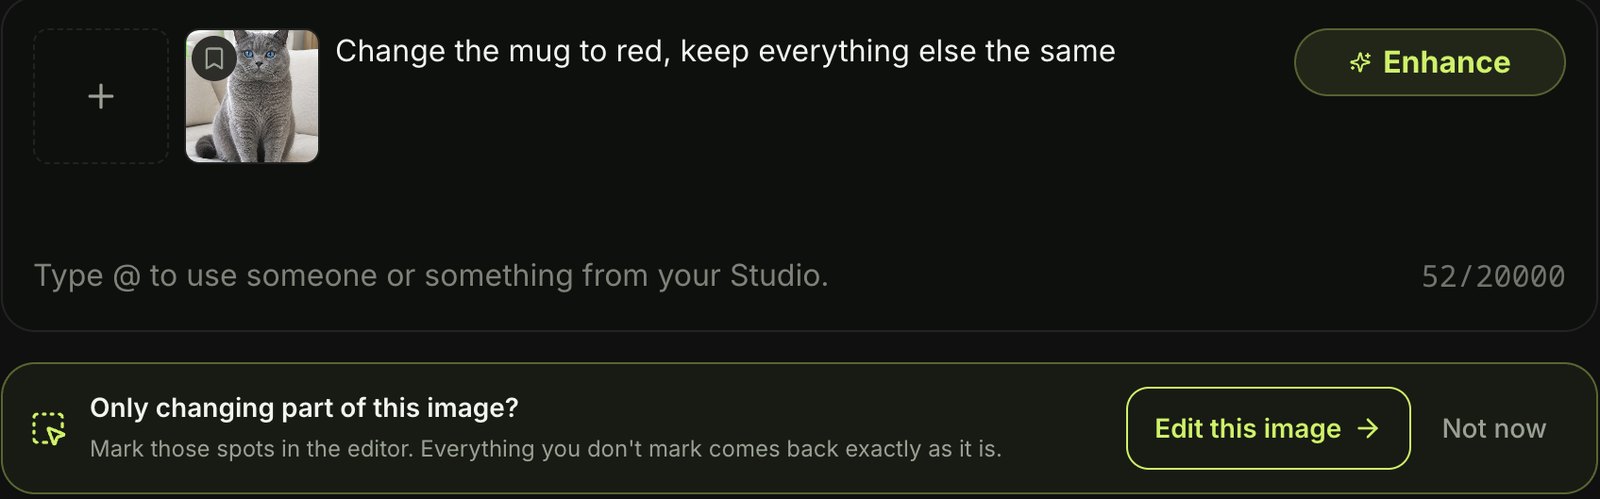
- After an upload: When you upload one image and write a change like "Change the mug to red, keep everything else the same", a hint appears reading "Only changing part of this image?" — "Mark those spots in the editor. Everything you don't mark comes back exactly as it is." — with the buttons "Edit this image" and "Not now".
FAQ About Editing Part of an Image With AI
Here are four quick answers about how to edit only part of an image with AI in Seadanse's editor.
How do I edit just one part of a picture?
To edit just one part of a picture, draw a box over that spot in "Edit an image", write what to change in the box's row, and press Generate. Everything outside the box comes back exactly as it was in your original file.
What is AI inpainting?
AI inpainting means the AI redraws only a part of the picture you mark while leaving the unmarked area alone. Other editors mark that part with a brush or a selection tool, while on Seadanse you mark it by dragging a box.
Can I generate multiple variations of an image at once?
Yes, you can generate multiple variations of an image at once by putting up to 6 options in curly braces like {gold, silver, red}. You can also pick ×1, ×2 or ×4 versions. You can get up to 24 images in one press, and each change is tried on its own copy of the image.
Can I keep editing the result?
Yes, you can click "Continue editing this one" on any result to start your next edit from that image. The editor tracks your steps in the "Edit history" trail ("Original › Edit 1 › Edit 2") so you can stack changes one after another.
Edit the Part of an Image You Want and Keep the Rest
When you mark a box in the editor, only the spot inside your box is redrawn and everything outside it comes back exactly as it is in your original photo. Open Seadanse's image editor to box your first change, compare it with the original, and download the result.
Written by The Seadanse Team; we ran every edit in this guide in the editor on November 19, 2026.
Related Articles
- Nano Banana Changes the Whole Image? Why It Happens and How to Stop It — why a prompt-only edit redraws everything, and the fix that holds.
- How to Change Text in an Image With AI — box the words, write the replacement, try colours in one line.
- How to Swap a Product in a Photo With AI — box the product, list replacements, keep the price tags and the rest untouched.
- Best Nano Banana Image Editors — the editors side by side, and which ones let you mark an area.


